Thursday, December 31, 2009

Boom, Boom, Boom, Happy New Year & a Giveaway!

ETA: Our Winner of the From My Kitchen is Nathalie from
Scraprat.blogspot.com
Thank you so much everyone, for entering :)
Nathalie please email me at cuttingaboveblog@gmail.com


Hi Everyone,
Happy New Year! Thank you so much for supporting the blog and leaving comments.

Our New Year plans doesn't involve anything glamorous( gasp!) yeah I know!!!
but that doesn't stop me from creating a simple card by adding a little spark to the  invitation for a few friends.

What are your plans for New Years?

We plan to go to church, then have a few friends over to ring the new year!

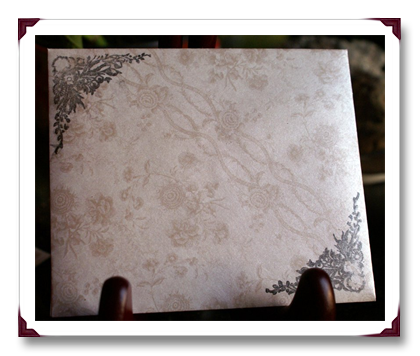
Here's the simple card I created.
My biggest challenge was to keep it simple and just use the cuts off the cart.


The Journey:
Cut the envelope first I cut at 7 inches, ink the edges.

Card was cut at 4.5 inches,ink the edges, add bling cut the year out of bling cardstock ink the edges.

The Cast:
Uhu Glue, Wild card cartridge, graphically speaking cartridge , Cricut Expression from Provo Craft, Bling cardstock DCWV, Rhinestone Mambi, Fluid chalk by Colorbok.

Happy New Year!  to start the new right I’m giving away From Kitchen Cartridge!

Cartridge is donated by our sponsor Provo Craft.


What do you need to win?
Easy!
1. Leave a comment
2. sign up as a follower
That easy eh!
Winner will be announced on  January 6th
Maggie

PS the code for the blinkie has changed here is the new one,

Photobucket
Share/Bookmark

Wednesday, December 30, 2009

So Clooooooooose!


Hi Everyone,
Happy Hump day! How was your Christmas? Mine was pretty quiet loads of time with family and catching on movies.
Watched the movie District 9, I gotta say it was pretty sad, and predictable...we watched Julie & Julia that was pretty good, Harry Potter the half Prince blood was my fav by far.

We did go see Avatar by James Cameron omg what an awesome movie... if you have not seen run run run...

I was so clooooose to being done with all my gifts and sending cards to everyone this year, then my DH hit me with don't forget Georgeanne  Birthday! what, what,  it's your sister's Birthday again????
It's almost noon the post office is going to be closed for Christmas at 1 pm....

I gotta tell you it's cold here in Florida in the 39's the idea of going out in this cold weather is not appealing at all.
I did the best that I could I sent her an E-card, mailing this one to her tomorrow since it's still cold in the 45 degrees.brrrrrrrr

The Journey:

Create card 4.5x5, cut Pattern Paper 4.25x4.5, punch the edge and ink
Cut  mats adhere with Uhu glue to base, use label #8 from spellbinders to stamp sentiment
Adhere flowers and MS punch oak leaf ad pearls
Voila You are done!


The Cast:
Basic Grey Pattern Paper, Cuttlebug Machine from Provo Craft, Spellbinders Nestibilities label # 8, Uhu Glue, Colorbok fluid chalk. Prima  got flowers flowers, Martha Stewart Punch, Mambi pearls, Inkadinkado stamp, brilliance ink.


Voila done,
Have a great new year everyone,
Maggie

PS have you seen the new folders coming out from Provo Craft the Asian Line?
Take a look here
Share/Bookmark

Friday, December 25, 2009

Prize Recap!

Hi Everyone,

Merry Christmas everyone :)

I hope you find it in your hart to forgive me for not being active on here, I plan on doing a better job coming this coming  New Year!

You will see we have a new format where we will showcase, stamping ideas, card making ideas,die cut ideas, and give a few prize here and there along the way :)

Here’s a recap of our winners, some of  them  have been notified and prizes have already been sent.

4x6 idea book winner is Christina,

Pink Journey Soneta

we have not heard from

okieladybugsscrapnmore who has won our blinkie patrol :)

alwayscharlie who has also won our blinkie patrol :)

Ladies please contact me at cuttingaboveblog@gmail.com so I can get your prizes out to you :)

Have a great Holiday,

God Bless!

Maggie


Share/Bookmark

Wednesday, December 23, 2009

Jolly by Golly Christmas is almost here!

Hi everyone,
We are only 72 hours away from Christmas, what happened?
Seriously, ladies, I'm frantic looking for something, anything, for my DH! Now I gotta tell you there's no tool invented he has not had in the garage, so tools are out..

Books, he is an avid reader so that one is out...My friend Michele gave us a restaurant GC for the year, so that's out as well..

No, he doesn't play Golf, even though we live in FL, so that's out...

While I pondered what to give DH, yet what Santa will bring him?
I've decided to schedule the pondering at another time and concentrate on a leisure activity :)

CRAFTING

So, I have my trusty SCOR-IT and the envelope template, and I decided to create a postcard card…
Do you by any chance know what a postcard card is????

Well, let me tell you. Ok here’s an easy explanation - it’s a one layer card that is not a folded card. Just like a postcard, you get to stamp or write your sentiment on the reverse side… the twist is, like a card, it does have an envelope.
Isn't that clever?

Yep, ladies, you’ve seen this here first, shhh…….

Here is the Card and the Envelope…


Our Journey:

1.Cut cardstock base to measure 4.5, cut Pattern paper 4 1/8, adhere to the base.
2.Cut 1 scallop on the Cricut 3 inches, another at 2 1/2, ink the edges, use the Cuttlebug machine to emboss the scallop, stamp a sentiment.
3.Cut another strip 4 1/2 by 1 1/2, ink the edges and stamp.
4. Adhere to the base, add bling on the corners


I stamped the envelope with a corner stamp to add more texture.


The Crew: 

Uhu Glue, Scor-it, Inkadinkado, Technique Tuesday,Mambi, Cricut Expression, Cuttlebug Machine from Provo Craft, Nestabilities, Colorbok fluid chalk.

Have a great day, and if you have any ideas on what I should get, please let me know?

Have a fabulous day,
Maggie
Share/Bookmark

Tuesday, December 22, 2009

Can you believe we are 3 days away from Christmas?

Hi Everyone,

HO-HO-HO, Happy Holidays!


Where did the year go? I'm amazed that we are only 3 days away from my Favorite time of the year..
Are you all set? any last mte gifts you need to create.

Have you seen all the great ideas on the Cuttlebugchallenge blog?

This fun set has been created by Shantaie


Instructions are at Cuttlebug challenge here

Have a fabulous day,

Maggie
Share/Bookmark

Monday, December 21, 2009

What is on your Christmas List?

wishlistcard_728x90 

Hi Everyone,

I have several carts on my Christmas wish this year, including a bag for my Cricut. com, I was excited to see on Cricut.com you can create a wish list then send it to your family and friends, what could be more easy than that?

There are several deals going on till Wedn, take a look there

wishlistcard_300x250

Provo Craft has made it easy to be able to select the items you want.

Have you seen the bundle that was release on HSN a few weeks ago are on Cricut.com now!

green_03

Happy Holidays!

Maggie


Share/Bookmark

Sunday, December 13, 2009

12 Days of Christmas Inspiration-Decorative Plate!


Hi Everyone,

memecopyI’m Maggie,

Omg this is the most wonderful time of the year for me, it’s simply my favorite season outside of Fall :)

Today is day 2 and the 12 days of Christmas is the Dove!  at Cuttlebug Challenge Blogspot,  I’ve created this Home decor using the Dove as an accent piece to carry the theme.

Supplies needed:

Cricut Expression,Gypsy, Cardstock from Provo Craft, Storybook Cartridge, Hannah Montana Cartridge, Making Memories papers and embellishments, Bling and twig from Micheal’s, Jenni Bowlin Bingo Card,Uhu Glue,  Ribbon Mayart. Charger Plate.


How to:

1.Cut the embellishments from the Gypsy, I cut the scallop at 8 inches to fit onto the plate, cut the Dove, cut 4 stars in decreasing sizes.

2.Ink the edges of the scallop and adhere to the plate, cut 1 mat 6 3/4inc and another at 7 inches, adhere to the scallop.


3.Wrap ribbon around the bingo card and add the pin hat, adhere to the side of the mat. Mat the trees with various cardstock colours, ink the edges of the stars and add the to the right under the Bingo card.


4. Add embellishment around plate and add the Dove to the left of the trees.


5. Add the silver twigs to the back of the bingo card.

Voila you are done, very easy!


Here’s the final Home Decor Plate


Have fun, don’t forget to leave me a comment let me know what you think?

Have a wonderful week,

Maggie


Share/Bookmark

Monday, November 30, 2009

How to Crop Photos Using the Silhouette!

Something that I love to use on a layout is cropped photos, photos that have unusual crops are so interesting! Something amazing about the silhouette is that you can use your machine to do just this!!!

First as always open a new file.

Next go to your upper toolbar and look for the import file button.

Next place your image. Note bigger files will take longer to load for an example I chose a jpeg file that is a photo of my Christmas tree this year after my kids decorated it. Edit size and placement, making sure to place image inside your cutting area.

Next in the same area of your toolbar there is a tab labeled "Clip Image" while your image is selected click on this tab. Next there will be a blue outline to your whole image rather than the editing arrows.

After you have clicked on "Clip Image" choose one of the closed line tools such as the rectangle or rounded rectangle on your left toolbar.

Click and drag a rectangle or circle around the whole image you want to crop.

Click again to clip your image.


To get a super close crop use the closed spline tool on the left toolbar near the rounded rectangle.

Next select your image and press the "Get Outline" tab.

A new window will open up to edit your cut lines. Click on the "Outer Frame Only" box.


Click "Paste Then Exit" and your image will paste to the cutting area.

Deselect image and add registration marks by going up to the top toolbar clicking on edit then clicking on registration mark settings. Check the box that leaves the marks and press ok to place them.

Print out your image on your selected media, load media into Silhouette and press cut. Then your image will be cut they way you selected!
Share/Bookmark

Tuesday, November 24, 2009

Thanksgiving Layout using your cricut!

Hello. everyone! Today I have a Thanksgiving layout. I always find them difficult to do, but boy are they necessary for your scrapbook!


This double page layout is made mostly with core'dinations cardstock. I just love that stuff!


I used the Designer Calendar cricut cartridge to cut my title(pg. 51 in your handbook) cut at
4 1/2". The turkey is from the My Community cricut cartridge(pg. 32 in your handbook) cut at 3 3/4". I also sprayed the title with glimmer mist to give it a little bit extra.


Those cute Pilgrims and Indians are from the My World cricut cartridge(pg. 31 in your handbook) cut at 4 1/4".


To get the turqoise look of the rhinestones, I colored clear rhinestones with a aqua colored copic marker. That is one of the good things about those markers! You can customize your embellishments!


Thank you so much for stopping by today! Have a safe and fun Thanksgiving!


Share/Bookmark

Sunday, November 22, 2009

Working With 3 Dimensional Shapes Using The Silhouette!

Today we will look at purchasing shapes online and working with a 3 dimensional shape that can be downloaded from the online store.

First as always open a new file go up to "View" and click on "View Grid"

Next, on the left hand column there is a tab that says "Purchase Online" and has a little computer mouse icon next to it. Click that tab and wait for the online store to load.

When your store uploads this is what your page will look like.

Here you can browse all sorts of shapes. For this tutorial I entered the word "Boxes" into the search box. Download the "Icicle Box" after you purchase and check out it will take a few minutes for you shape to download.

After the box shape has downloaded open your Robo Master library. Select the shape.

Place your image and be sure to stay within your cutting area.

Press the cut button and click your way through the operation guide. When you image is done cutting, fold along dotted lines and glue on tabs. Punch holes in sides for ribbon strings and adorn according to taste.

Here is my example.


Share/Bookmark