Showing posts with label cricut. Show all posts

Wednesday, March 30, 2011

Treasure box for Spring

Hi Everyone,

The party continues this week with my Daughter being on Spring break. Are you hanging out in style? We’ve had a plethora of hungry teen in the house. I will be sharing a quick and easy recipe with you today, along with a box of treasury that I created for 4 of my daughter’s friends.

Treasure box I created for my daughter and her friends, to gather treasures this summer! I’ve seen the 7gypsies boxes all over this spring, some put atc cards in the box, others collect embellishments. I had my DH create one for me out of plywood. It measures sides are 6.5wx14.5lx6.5h. The best part is you can create this to fit any size you want.


SONY DSC

Paint box, let dry.

SONY DSC


SONY DSC

Cut paper from old book, use spray adhesive like 3 m.

SONY DSC

Paint over the old book page, drill a hole in the center using Fiskar drill.

SONY DSC

Voila done, your very own drawer box Smile

SONY DSC


Shepard's pie was a big hit with the teens at my house :) I use a Martha Stewart recipe, which I changed a bit, added more veggies, used Mozzarella instead of Cheddar, instant mash potatoes and heavy cream, unsalted butter :)


DSC01959


DSC01960

DSC01963


Have a fabulous day,

Maggie


Share/Bookmark

Wednesday, March 23, 2011

Spring Break 2011 & Recipes!

Hi Everyone,

Happy Spring break 2011, my dd will be out of school this weekend, we are starting to have hot and hotter temperature, perfect for a beach outing.

Speaking of outing have you seen the contest GCD Studios is currently running?

Using your stash, this stamp sheet is over 3 years old. I am determine to start using my older stash. I found this huge Music Hymn book at Salvation Army, I use the deacidifier to spray the sheets before I cut , 18 circles from Cricut Mini Monogram. Spritz them w/glimmer mist, ink the edges, scrunch them a bit then added brads and pearls to the center.

Added an old K & Co epoxy sticker

SONY DSC


SONY DSC


Create this lo in less than 10 mtes by using premade die cuts.

SONY DSC


Use Diamond dust on a chipboard letter for a glittering  monogram.  Be careful of Diamond dust it is very fine.

SONY DSC


SONY DSC


Weekly Menu!

menutitle


Wednesday!

SONY DSC


SONY DSC


Ingredients:

Tortillas,Black Beans, Corn, Mexican Cheese, Ground beef, Cilantro, Onions, Tomatoes, Cumin, chili powder, Chipotle powder.

Brown ground beef, add Cilantro, Onions, Tomatoes, Cumin, chili powder, Chipotle powder, Tomatoes, Black Beans, Corn.

In a rectangle dish pan layer the tortilla and add ground beef, then cheese, keep layering until you are done.

bake at 350 for 20mtes.

Voila done!

Coupon deals at Walgreen


Don’t forget to sign up and be a follower!
Have a great day,
Maggie


Share/Bookmark

Sunday, October 3, 2010

Skincare Regimen for Gorgeous skin at Any Age!

PHi! I’m Court from Court’s Crafts and Maggie has so kindly asked me to write up a tutorial on skin care. 

I worked as a manager at a high end spa in Monterey, California. All skin-specific questions should be directed to your local aesthetician. But in my experience of hearing both the praises and complaints (as well as personal use) I can tell you what I think a good skin care regimen is and which companies I like best!
Different skin types:
  • Sensitive - Your skin reacts easily to harsh cleansers, facials, etc. If you have consistent allergies even if they’re seasonal,  I would recommend getting a sensitive skin care line.
  • Normal / Combination - which means you have some dryness and some oiliness. 
  • Dry
  • Oily 
  • Rosacea - Rosacea can be clinical and it can be extremely mild. I am prone to mild Rosacea so I mix the sensitive, Rosacea, and even the serum from the power-repair skin line. But I digress. Rosacea can be as severe as having rosy Santa like cheeks all the time or as mild as having little red lines just under the skin, or just a little too much pink for your liking. 

Maximum:
Morning
A: Wash your face with a gentle pH balancing cleanser. This means you will need to choose a cleanser based on your skin type. 

B: Find a toner. Mine is in a spray bottle and I spritz it on my face.

C: Use a serum. This is my biggest piece of advice and will go in the “minimum” catagory. Serums are not cheap, but they work better than anything else. If you have “normal” skin, after using a serum for a while you may not even need a moisturizer. It usually comes in a pump jar. Just pump once - an itty bitty bit, put it on your fingertips and press into different areas of your face. 


D: Find a good, light moisturizer. 
A moisturizer should never feel greasy on your face. If it does, you’re using too much. It shouldn’t even be a dime-sized amount. If it’s in a jar or tub, you should still basically be able to see your finger though it. It doesn’t feel like enough, but trust me, it is. They are counting on you using more so that you go through more and have to purchase more!  :)


Evening
A: Cleanser
B: Toner
C: Serum
D: Fine line and wrinkle cream - or something that is specific to your skin type.
I switched brands to Ayermedic for this product. It comes in an itty bitty jar and you use a slight amount around the eyes and mouth using your fourth finger to tap tap tap.


E: Heavy Moisturizer - this does not feel greasy, just more milky or silky and a little denser. 
Wednesday and Sunday NIGHTS: Exfoliate - An exfoliator should feel rough, but brands like Nutrogena have been known to scratch the surface of the skin making the skin look rough and a bit haggard. Don’t worry because the top layer of your skin regenerates every 3 days, but it is great to think about in investing in a good one. The reason to exfoliate at night is that your face is going to be red afterwards and it opens up the pores so you want a little dust, dirt, sweat, etc. to get in. 

An Exfoliator is used in place of the cleanser. All subsequent steps should remain the same. 

Substitute one of the exfoliating nights every other week with something equivalent of a peel. This is a little crazier and you should be taught by an esthetician how to do it. In my case it is a mud. Of course I am not talking about a chemical peel, but my mud peel should not at all be left on longer than 2 minutes. There are gentle peels as well, but for my face, I don't see a noticeable difference using them. Experiment! :) 
Of course, you can round it out with once a month facials. :) 

If ever something burns or makes you wonder if what it feels like is normal, wash it off immediately. This includes during a facial. Don't hesitate to ask or speak up. They like the questions and you should be confident in the knowledge they have. 

If you are at home, you can always call a spa and ask a local esthetician on the phone and most of the time, they will be able to answer you question about what is "normal". 
Minimum:
Cleanser
Toner
Serum
Light Moisturizer
Exfoliator
Courtney’s rules:
  1. Don’t waste your money on an “anti-aging” cleanser or toner. The “good stuff” is actually proven to help and it is most concentrated in the serums and moisturizers. 
  2. Don’t buy the whole kit and kaboodle. Start with the minimum (this is expensive, but I have found it to definitely be worth it) and build your collection if you continue to have the discipline to do it after a month. Some lines even come with a mini-set of all the products in a skin care regime. That's a great way to test them out as well.
  3. Use what you own. Go ahead, don’t get it until you run out of something. 
  4. Remember that spa owners are advised not to keep an esthetician unless they have a 40% sales to services ratio. Let me tell you, that’s high and they make it. So they are supposed to be good sales people (that includes service upgrades during a facial). Make your own decisions, be firm and go ahead and sleep on it. 
  5. Almost every spa has a “local’s discount day” where they will extend 10% off on all products and services. Ask about it when you book. It’s typically Monday or Tuesday.
  6. Have fun with it. It will definitely feel like a chore for the first week or so, but after that it will be fun and quick. 
All of the above pictures are the products that I use so you can see how I switch back and forth between lines (the colors of the tops are the different lines) as well as different companies. So don't be afraid to mix and match! The only one that I do not own is the Myoxy-Caviar cream, but my mom does, so I can speak for that as well. She uses this one during the morning as well as the evening. It is quite expensive though! She liked it a lot more when I was working at the spa and got her a discount! 


Here are the links to Pevonia and Ayermedic where you can use their search site to find a spa near you that carries these lines.


Thanks for joining me today and feel free to email me with any questions or hop over to my blog to say hello!


PS don't forget to share with us your skin care regimen and your fav products in the comment section?
Share/Bookmark

Saturday, October 2, 2010

I treasure You, Everyday!

Hi Everyone,
Let me say I treasure each one of you for visiting me, every day and helping spread the word..
I have created this card to THANK YOU!


Supplies:
Basic Grey PP, Mambi Rhinestone, Colorbok Fluid Chalk, Cricut Expression, Storybook Cartridge, Martha Stewart Punch, My Pink Stamper stamp.


Have you ever seen a new product and shake your head why I didn't think of that?
This is the case for me with  Cricutsearch.com
Let me tell you how amazing this search site is.
Have you ever type Scallop Heart in the Gypsy to have nothing returned?? Guess what no more frustration..
Circut search makes it easy at the click of a button not only do you have the item, but also the book with the page of the exact item you were looking for.. I tell you what, I was so impressed with Cricutsearch, I contacted Shawn immediately on how they come up with this idea..
You can read their story here
Next time you are looking for an item, don't waste time flipping thru the books, go straight to Cricutsearch.com


Here's a schedule of what we have coming up for you.


Sundays: Fashion

Mondays: Weekly Menu and coupons

Wednesdays: Crafting 

Fridays: Card Making with Kristi

Monthly Feature

First Tuesdays of every month: "Let's do Lunch" where we explore a restaurant for two in our neighborhood for two on a $15.00 Budget.. Can you do it? are you for this challenge?

Here's what this challenge is about. As crafters we have busy lives, with kids, work, home, family etc..
This challenge is to take your significant other, friend, mother sister, whoever you want and go to town on $15.00 now there's a catch it can't be fast food..
It has to be an  actual restaurant..

What you will need!
  1. Pictures of your food
  2. Picture of the restaurant
  3. Picture of the Bill
 Create a post and leave a link for a chance to win a prize..
Doesn't that sounds like fun?

Second Saturday of Every Month: Book Club!
We will discuss a book and take your suggestions of what to read.. Participate in the discussion and have a round table..
Let's do a book exchange by listing books you want to trade in the comment section.. Remember to exchange you have to participate in the discussions.
It can be Audio books, any books not of a sexual nature..

What do you think so far? anything you would like to see covered?

Here are our winners..
Once upon a Princess Winner is Jennifer

Blogger Jennifer said...
Your menu sounds like mine, Maggie!!!;) We only eat two or three things during the weekdays (we aren't afraid of leftovers at my house, either).

Thanks for sharing,

Jennifer,


Home Decor Cartridge 
  Chris Wooten said...
yummy that pizza made me hungry.


mississchic said...
Wow, you can enter as many times you want!? You're gonna have a million comments! We do love giveaways! Thanks for the chances. mississchic@ yahoo dotcom Pink Stamper Video
littlen said...
I haven't taken it yet, but I'm headed there now. Elegant Cards winner


Melissa said...
Your cards are gorgeous Maggie and I'd be honored if I am lucky enough to win them!

Wish I was close enough to come visit this weekend! LOVE Cosmo Cricket stuff!!!


William Sonoma Gift Certificate..

stefeni said...
I've always wanted a nice spice rack, except that's all it'd be cuz I'd never use it. Wish I held the skills to cook a decent meal! Ladies thank you so much for making this so much fun.. You have 7 days to claim your prize, and please make sure you send me your correct address. I'm not responsible for Customs Taxes or lost items. Please email me at cuttingaboveblog@gmail.com Please put in the subject line your username and what item you won? Don't forget to stop by Sunday as we have a great post on skincare regimen for you :) Thank you, Maggie

Share/Bookmark

Friday, September 24, 2010

Simply elegant wedding cards & Giveaway!


Hi Everyone,

It's the weekend and I'm looking forward to be out and about...The Collins group convention is in Orlando. Cosmo Cricket, SEI, Prima and countless other mfg will here.

I will be helping with make and take at the Cosmo Cricket booth so if you are in the area, please stop by and say hello..It will be a lot of fun loads of prizes.


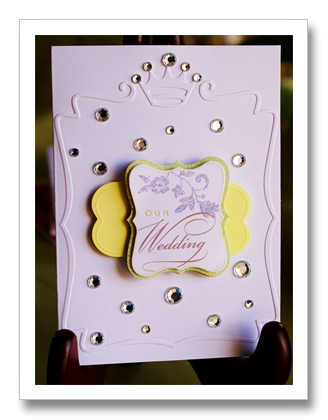
By popular demand, we are going to focus on how to create a simple elegant wedding card in less than 2 minutes. I just know you are going to luv how fun and easy it is to learn and create these cards. These basic principals can be applied to create many other cards not just  for weddings.

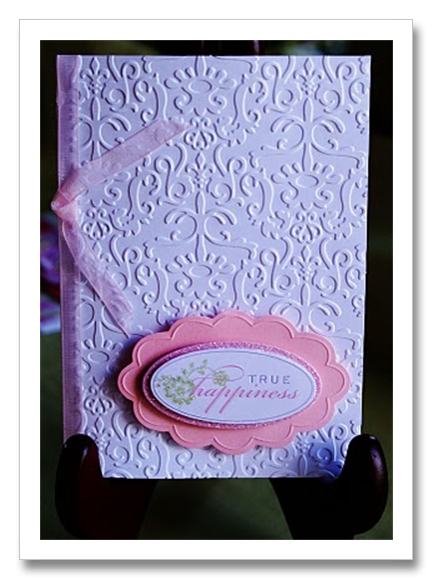
Simply start with premade blank cards from your craft store. They come in 25 to 50 cards per packs w/envelopes. Emboss with Cricut cuttlebug folders.
Then use your stash of stickers, embellishments, and or rhinestones to create a stunning card.


Instructions

  1. Emboss card base with Cricut Cuttlebug embossing folders.
  2. Embellish leaves with stickles.
  3. Adhere embellishments with pop dot glue to base of card.
  4. Adhere rhinestones.
  5. Add ribbon

Supplies

Tools: Cricut Cuttlebug Machine, Cricut Cuttlebug Embossing folders 
Embellishment:: Martha Stewart tags, K & Company Wedding embellishments, Mambi rhinestones

The best part is I want to send these 3 cards to you!
How to enter?
Leave a comment on this post with your email address.
Be a follower of this blog,
Post this on your blog or any forum you belong. Winner announce on October 1st.

Other giveaways for you to enter
giveaway of Mypinkstamper DVD Here

and a $10.00 GC to William Sonoma Here

More giveaway to enter for 3 Cricut Cartridges (2 Home Decor) ( 1 Once Upon a Princess)Here

Have a fabulous weekend!
Maggie


Share/Bookmark

Wednesday, September 22, 2010

Creating treasure with recycling in less than 10 mtes!


Hi Everyone,

Happy Hump Day! as a collector of all things pretty, I've found myself keeping all the pretty packages of products I purchased for use on a later project.
I purchased this stamp set a while ago it's Kelli Panacci timeless and knew the package was too pretty to throw into the recycle bin. Instead I keep a collection just for such occasion..
My favorite to collect is Prima, Eksuccess, they are always so ornate with fun colours.

I created this treasure card using the packaging and Mypinkstamper sentiments, they are just pure fun..

Treasure card


Instructions
  1. Stamp all over the base card. Trim package to fit card base, ink the edges, then adhere together.
  2. Trim clock from package, ink edges, stamp butterfly, adhere with pop dot glue.
  3. Cut pattern paper to fit bottom of card base.
  4. Stamp sentiment on a strip of paper, ink the edges, add rhinestone, adhere with pop dot glue.

Supplies

Stamps :: Mypinkstamper (Family & Friends), Inkadinkado
Ink :: Colorbok Fluid chalk
Cardstock:: Paper source, Pattern paper Basic Grey
Embellishment:: Deja Vu


Have a great day,
Maggie

PS Don't forget to enter the giveaway of Mypinkstamper DVD Here

and a $10.00 GC to William Sonoma Here

More giveaway to enter for 3 Cricut Cartridges (2 Home Decor) ( 1 Once Upon a Princess)Here
Share/Bookmark

Monday, September 20, 2010

Pretty in green, my steady lover (Cuttlebug)


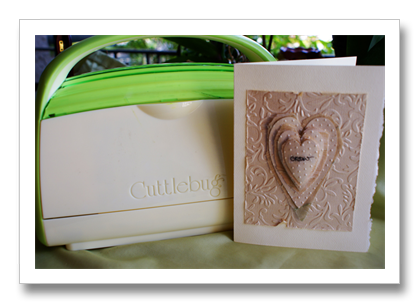
If I was to say I've been in luv with this little machine will be an understatement. I've been completely besotted with this little machine..
So besotted that we have a blog devoted just to this machine.. Cuttlebugchallenge.blogspot.

The new line is so sleek and so kewl just like a little purse, but the best part is it's lighter and have it's own onboard storage for the handle..
Here are some pics and a video of me demoing it at CHA at the Provo Craft booth..

Here is a simple card yet elegant.

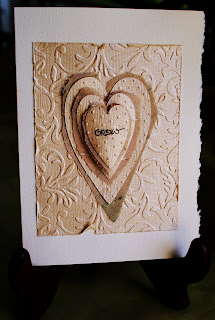
Grow elegant card

Instructions
  1. Cut  3 hearts using Gypsy font  from Cardstock 3.75", 3.5", 2.75" embossed with Cricut Cuttlebug Swiss dot folder , spray with Tattered Angels glimmer mist. Cut 3 hearts in fabric slightly larger, then adhere to cardstock hearts.
  2. Cut a mat 4x5" emboss with Cricut Cuttlebug Victorian a2 folder, spray with Tattered Angels glimmer mist. Distress edges.
  3. Adhere to base card.
Supplies:

Cardstock :: Coredination
Embellishments :: Sticko sticker, fabric
Tools :: Provo Craft Cricut - Cuttlebug, swiss dots embossing folder #37-1604 , Victoria A2#37-1916


MaggielamarreHappybirthday-cuttingabove 


Menu for the week!


Free sample and coupon here


 Q&A
How to get free produce at Target.
1.Check your Sunday coupons, check Target website for coupons here
2.Use both coupons on sale items. Don't forget to print the coupons at the gift registry section.
3.Print coupon online using the black feature to save ink instead of colour ink
Redplum

Have a great week, keep the questions coming.

PS..don't forget to be a follower and leave comments for the 3 Cricut cartridges giveaway here

The William Sonoma $10.00 Gift Certificate here

Maggie


Share/Bookmark

Thursday, September 16, 2010

What is your Creative Style?

This is a really kewl quizz, it was very accurate for me..
I hope you take it..

Psychologies quizz


Here is what it says about me...

For you, creativity is first and foremost a form of expression: it creates a special link between the internal and external worlds. It allows you to get a grasp of your powerful emotions, by molding them into a physical form. In fact, the most important thing for you is to be able to release your emotions. You need to be able to touch them or look at them in concrete form, and to do that you have to find a way to make them come alive. This is how your desires and anxieties take shape. 

Keeping things bottled up creates a tension that can only be resolved once you have expressed how you feel. This means you have to be strong enough not to let yourself get swept away by chaotic impulses; if you turn your creative urges on everyday life — making a picnic, singing to the baby, choosing what to wear — you can express yourself while staying rooted in reality. Creativity is principally cathartic.


It relieves a deep need, an almost primal, archaic impulse. For you, being creative is about having the power to give form to something you feel, to those deep personal issues that are often raw and disorganized. For these reasons you are usually attracted to art that demands physicality, that allows you to express what’s inside, and that unites spontaneity, strength, freedom, power and movement.

Let me know if your came close? don't forget the cartridge giveaway here


Have a fabulous day,
Maggie
Share/Bookmark

Tuesday, September 14, 2010

I am dreaming of Tulips!

I am sooo loving the stencils right now. You know how you go in phases? Well this is one of the phase things! There are just so many options with them.
Here is the other recent technique "Quite a Pear"  I share earlier.

I am going to share with you the embossed image of a tulip that was done using the Cuttlebug! Once you have created the layers for your machine and run it through, the result is a great embossed image.

So here is the card and the very easy steps to recreating it!


Step 1 Dry emboss the image of the tulip using the Cuttlebug Machine from Cricut.

Step 2 Leaving the stencil in place add color using a stencil brush. I used PanPastels by ColorFin. They have a rich color and go on smooth with very little pressure.

Step 3 Layer the image on coordinating card stock. The base layer was cut then folded in half using the Score-It-All.

Step 4 Use the punch of your choice to add the decorative edge to the card and finish assembly of the card!

Again, I love and am obsessed with the stencils right now. This stencil and the pear stencil were both provided by Dreamweaver! They have, in my opinion, the most versatile and elegant stencils on the market.

Check out my blog and the links there to see more with great stencils! Also, if you will be near Topeka, KS, October 1st and 2nd, check out the Memory Expo. There is a link on my blog to check that out as well!
kristiscreativecafe.blogspot.com

PS Don't forget to sign up to be a follower and the three Cartridges giveaway HERE
The William Sonoma Gift Certificate HERE

Happy Creating,
Kristi

Share/Bookmark

Saturday, September 11, 2010

Is it Memorex or is it live?

Hi Everyone,
I get so excited when I find excellent ART that makes me question what I'm seeing.
Which brings to mind the tag line from Memorex.. Do you remember them Is it Memorex or is it live? before the advent of cd and dvds. I know some of you is too young to remember it... Walk down the memory lane with me for a moment..

I fell in luv with this artist work, at first I thought they were photograph, till I found out they are actual paintings.
Can you imagine having so much talent that your ART is taken for real life???
That got me thinking what have I created lately that makes me want to hang it on a wall and be able to see it on a regular basis and feel awe by it???

The answer is my darling daughter, I did have help from God and some help from My ex..lol

The ART of Collin Boggle

Let me know what you think?


He also does still life


What changes you are about to make in your life? 
don't forget the 3 cartridges giveaway here
$10.00 Gift Certificate to William Sonoma  HERE


Have a great day,
Maggie
Share/Bookmark

Tuesday, August 24, 2010

What could be simpler than 5 measly little goals?

Right???? You would think having 5 simple goals will be very easy to keep, no siree...
when it comes to keeping my desk clean, it seems like I have some type of revulsion to clean desk...

Keeping the studio clean you will think will be my priority #1 right, then you would be wrong...
I'm too busy piling my stashes from Joann, Micheals, online, garage sales, yard sales, than actually finding a home for them right???

You will think goal #3 will be easier, to do??? which is purging the old for more space for the new, nope I always think of something I can do or make with them..

Goal #4 you will think as a blogger I will be eager to participate in other blog challenge right??? not so, I hardly have time to update my own blog let alone to participate in challenges, unless they are for the Cuttlebug challenge blog...

Goal #5 finish my dd baby ablum, after all I got into scrapping so I can commemorate her childhood right??? not so to date I have at least 12 half finished album.


So here's my challenge to myself and you as well. I don't believe in New Year's resolution I never keep them :)
However this I should be able to manage.

1.From now to December finish at least 2 album..

2. Clean my desk

3.Clean the stashes

4. Purge the papers give to Ronald Mcdonald.

5.Participate in at least 2 challenges a month..

That's it right??? I will update you every month and let you know how I'm doing...
Shall we have an incentive for this???
Let me know what you think??

Have a great day,
Maggie
Share/Bookmark

Monday, August 16, 2010

Love

Wedding season has been going on and this is a great card that is easy to make for that special couple or for that special someone. Yes, this is also anniversary season! I started with one of the pre-made cards from a value pack. I like these cards as they are a bit larger.


First, I stamped the words on the base card. I just stamped them any ole' way. This simply serves as a background. You can us the quote or word stamp of your choice.


Next I stamped the background image on a full sheet of paper and embossed with a heat tool. I took out my Love Struck cartridge and cut out two different size hearts from my embossed card stock. I edged them in Pale Gold Krylon pen.


I attached the hearts with some pop dots at different levels and finished off the card with a petty little flower. I also used the background stamp on the envelope to tie the project together!


You could use this same sketch for a variety of themes. Happy creating...Kristi


Don't forget to come to my blog and follow! kristiscreativecafe.blogspot.com


Share/Bookmark