Monday, August 30, 2010

Get excited and make things! Free Cricut Cartridges Giveaway!

Really, this from a poster I saw on a blog... This reminds me of the messages you find in the dove chocolate, not that I really ate the whole bag, I was doing research so I had to eat the bag to see what each messages was......lol

Get excited and make things, mmmmmmm, Yep I got excited (NOT).


Created a layout for a friend..
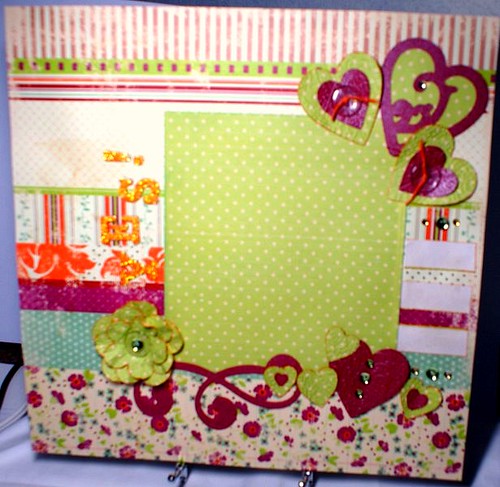
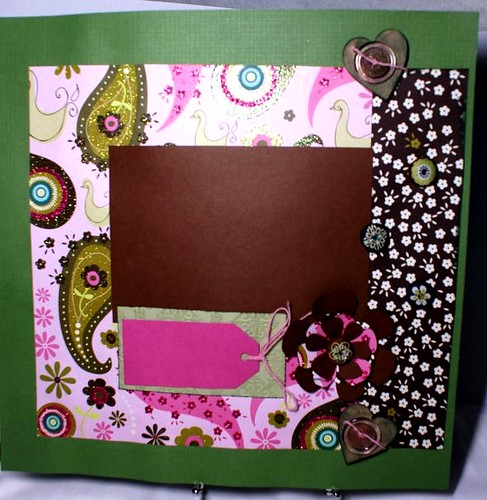
She wanted it very simple and wanted to use these paperss that are not my style at all..
You will agree with me those colours together is not something I would have put together..oh well, I did create something, not my best, I just couldn't work with these papers for some reason...:(
I kinda feel guilty cause it took me less than 15mtes to make this lo..Using the Cricut and Cuttlebug..

She was happy with the results, that's all that matters right???


Cuttlebug, Provo Craft Cricut, Cricut Cartridges.


My weekly Menu:
This week I have to up my budget a bit since I have company coming, so my bill will be around $71.00 that's feeding 7 people all week..

Monday:
Beef n Broccoli, Winn dixie had them on sale for $.88 a bush. I stock up and flash freeze them. Using left over rice I froze from last week dinner.


Tuesday

Pizza nite with tyson chicken appetizer, strawberry ice cream. Winn Dixie has a special 2 pizza, 1 Breyer ice cream, 1 box of parmesan bread sticks, 1 coke bottle for $13.99, I'm going to get 2 for 28.00..
I plan on going back on Tuesday to get more and deduct it from my budget next week.


Wedn
Chicken Alfredo Pasta, Micheals' had the tri Pasta in their dollar spot for $.40 cents so I brought 10 bags.
I have the chicken marinating in lemon pepper to give it a kick..

Thursday

Beef and Broccoli left over, I need a break from cooking :)

Friday

Roasted Asparagus with capers chicken and garlic rice (courtesy of Rice a roni) :) Big Lot has them on sale for $.49 cents a box, so I picked 10 boxes..:)

Saturday
Going out..

I am working on this post this week.
I am going to tackle my closet and the desk this week. What are you going to tackle this week?

What's on your menu this week? How much are you saving this week?


I am giving away 3 cartridges below.. Home Decor and Once upon a princess, see the info below..

What we are giving away:

  • There will be two blog followers winners! each winner will receive 
  • a Cricut Home Decor Cartridge


How you can win:

  • Leave as many comments as you wish on all the post on this blog, from today till Sept 30th. 
  • Follow the blog and tell your friends about this giveaway.
     Winners will be announced on Oct 1st 2010

Please remember: Help spread the word about this giveaway!


Who is eligible:

Everyone! You don’t have to be a blogger to win, just supply a valid e-mail address.

When the giveaway ends:

October 1st. I’ll e-mail the winner(s), and results are always posted here as well. If the winner doesn’t respond within seven business days, a new winner will be drawn.


Have a great day,
Maggie
Share/Bookmark

Sunday, August 29, 2010

Yes You can, This moment!

 I've been looking at some older carts and rediscovering the amazing possibilities that I've missed...
How on earth could have missed those amazing swirls????

I had no set rules on creating I just wanted to layer the heart with the filigree, once I started then I wanted to add more hearts to finish the look I wanted..

I am challenging you to add dimension to your cuts by layering...


Here's the recipe:

Supplies:
Provo Craft Cricut Expressions, Provo Craft Gypsy, Gypsy Font Cartridge, Home Accent ,Graphically Speaking Cartridge,Cuttlebug  Machine and folder Holly Ribbons,MM Pattern Papers, floss DMC,fast finish decoupage, 3in 1 beacon adhesive, Copic Markers, Mambi Rhinestones.

Let's Cut:
 Cut 11 hearts in ascending order 4 inches, 3 inches, 2.5 inches, 2 inches, 1 inch. Embossed with Cuttlebug folder Holly Ribbons, apply fast finish decoupage
Cut 2 swirls from Graphically Speaking, ink the edges with Copic Markers.

Cut 3 flowers from
Home Accent at 3.25, 2.75,2 inches, Embossed with Cuttlebug folder Holly Ribbons, apply fast finish decoupage, ink the edges with Copic Markers. Adhere the buttons with floss.
Cut Frame from Gypsy Font, Ink the edges with Copic markers.

Let's assemble:

Adhere Frame onto pattern paper, to the center right, Adhere 3 hearts and filigree to the top right corner.
Adhere Journaling Strip to the right of the frame.

Tip Use the bottom white section of the paper for your Journaling.

Adhere both swirls to the bottom of the frame and the hearts.
Adhere the flower with brads in the center to the left of the swirls.

Add title
Voila you are Done!

Maggie

Here is the Layout again..


Share/Bookmark

Friday, August 27, 2010

Escaping the Mundane!

Hi Everyone!
Happy Friday! I've been working on some projects and after spending time with them I realized they are not my best work..

My question for you is what do you do with work that you are not happy with? Do you chuck it, give it to someone else, or bury it in the album and move on?

I am sharing the layout with you and the steps I took to create it.


Here is the Recipe:

Provo Craft Cricut Expression, Cricut  Gypsy, Pattern Paper, Home Decor Cricut, Storybook, Plantin Schoolbook, Graphically Speaking, Sentimentals  Cartridges, Gypsy Font, Cuttlebug Machine, holly ribbon folder, fast finish liquid laminate, 3in 1 beacon adhesive, Foofala buttons,Stickles,Basic Grey Button, K&Company pattern paper, Pink Paislee Stamps. Martha Stewart stamps, Staz on ink, Coredination Cardstock.

Let's Cut:

Cut 2 Chandeliers from Home Accent at 4.5 and 3.75 inches with 1 shadow, ink the edge with Copic Marker, add Stickles let dry and adhere to shadow.

Cut border Plantin Schoolbook at 5.5 inches, ink the edges, cut the title Escape.

Cut 2 labels from Storybook at 2.75, and 3 at 2.25 inches, ink the edges.

Cut 1 swirl from Graphically Speaking
Cut 1 Butterfly from Sentimentals at 3 inches, ink the edges
Cut Scallop from Gypsy Font at 2.75 inches, ink the edges

Let's assembled:

Adhere the pattern paper 6x12 on Coredination Cardstock, then add the border at 7 inches to the right, then add the other pattern paper cut at 6x6.
Adhere the Chandeliers with the shadow to the left of the top grid, then add the other Chandelier to the left, add Scallop Oval then pop  the brad onto  the center of the butterfly, add onto the scallop, using the tip below.

Tip Instead of using pop dot, use the white strip that most scrapbook papers come with by folding it onto a square and glue to achieve the height.
adhere the buttons, stamp flower in between.

Add title under the butterfly and Voila Done!

What are your plans for the weekend?

Have a great one,
Maggie

PS remember I told you I was reading the Girl with the dragon tattoo, I had to put it down, it was too thrilling and I was reading it so fast, I needed to slow down, instead I'm currently reading this new book..

Days of Gold by Jude Deveraux, yep every now and then I find a regency  intrigue romance that is kewl..
Let me know what you are reading :)
Share/Bookmark

Thursday, August 26, 2010

Summer CHA 2010, so surreal! New Provo Craft Cricut Circle!

Hi Everyone,
I don't think one post will do justice to the CHA experience last July in Chicago. Needless to say I didn't see downtown Chicago or much of Rosemont.
My time consisted of the Hotel, Dinner and the Convention Center...

Where do I began? I did help out at the Provo Craft Cricut Circle, since I am a Circle Member.. Are you a Circle Member?

The most exciting part for me was seeing the new Cuttlebug Machine and I have a video filmed by the lovely Christine from Scraptime..

You can see the video here, let me know what you think of the new design and colour combo..

Stay tune as I update more with my experiences from CHA....

ETA: this cuttlebug function the same way, the only thing that is different is the stylish shell and colour..It works the same way as before :)


Scrap Time - CHA Summer 2010 - Provocraft - New Cuttlebug and Folders from Mark Giles on Vimeo.

Maggie
Share/Bookmark

Tuesday, August 24, 2010

What could be simpler than 5 measly little goals?

Right???? You would think having 5 simple goals will be very easy to keep, no siree...
when it comes to keeping my desk clean, it seems like I have some type of revulsion to clean desk...

Keeping the studio clean you will think will be my priority #1 right, then you would be wrong...
I'm too busy piling my stashes from Joann, Micheals, online, garage sales, yard sales, than actually finding a home for them right???

You will think goal #3 will be easier, to do??? which is purging the old for more space for the new, nope I always think of something I can do or make with them..

Goal #4 you will think as a blogger I will be eager to participate in other blog challenge right??? not so, I hardly have time to update my own blog let alone to participate in challenges, unless they are for the Cuttlebug challenge blog...

Goal #5 finish my dd baby ablum, after all I got into scrapping so I can commemorate her childhood right??? not so to date I have at least 12 half finished album.


So here's my challenge to myself and you as well. I don't believe in New Year's resolution I never keep them :)
However this I should be able to manage.

1.From now to December finish at least 2 album..

2. Clean my desk

3.Clean the stashes

4. Purge the papers give to Ronald Mcdonald.

5.Participate in at least 2 challenges a month..

That's it right??? I will update you every month and let you know how I'm doing...
Shall we have an incentive for this???
Let me know what you think??

Have a great day,
Maggie
Share/Bookmark

Monday, August 23, 2010

All in one Monday!

Hi Everyone,
The house is so quiet, it's unnerving. Today is the first day of school for my DD she starts 11th grade. Already she is making plans for Prom and homecoming..sheesh I'm just not ready for prom yet...

I plan on taking loads of pics, I had no time this morning, she changed her outfit no less than 5 times and almost missed the bus...

It's been a while since I posted, life has been interfering in the fun...my friend Kristi has done an amazing job keeping the blog going.

Here's what I've been up to and hoping you will join me on here and share.

I've been very organized on getting my meals menu done for the week, with shopping list.
I've found I've reduced my weekly bill from 128.00 to $35.00 weekly..
Isn't that amazing?
I'm sure you are wondering how???

I'm the world worst impulse shopper, those items by the register have put there with me in mind....

I've been using this wonderful site call ziplist.com, I'm able to search for recipes, do my list, send it to my phone and shop.
I've also been doing the grocery game, where I found out what grocery store in my area is having a sale and what coupon can I use to save..

This is how I've been able to shave off 70% of my bill..

Here's ab example of my menu for the week..

Monday

Brown Rice with Lentil beans w/smokedwood bacon. Garlic chicken


Tuesday

Mexican rice with salsa/avocado/ground beef (using brown rice from Monday)


Wednesday

Lentil beans leftover


Thursday

Bourbon Chicken with Pasta


Friday

Ground Beef Mexican rice left over


Saturday

Lasagna

After using coupons for my list my grocery bill was a whopping $19.89 for the week for 4 people...

Yes it does work, I have not purchased anything this week that was not part of my list..


Leave me a comment and let me know what tips n trick you use to save on groceries?

I leave you today w/a layout I made of my mom celebrating 5 years of Cancer Remission.. Using Provo Craft Cricut Cartridges and stamping.


What books are you currently reading?
I am reading this book today!


Have a great day,
Maggie
Share/Bookmark

Monday, August 16, 2010

Love

Wedding season has been going on and this is a great card that is easy to make for that special couple or for that special someone. Yes, this is also anniversary season! I started with one of the pre-made cards from a value pack. I like these cards as they are a bit larger.


First, I stamped the words on the base card. I just stamped them any ole' way. This simply serves as a background. You can us the quote or word stamp of your choice.


Next I stamped the background image on a full sheet of paper and embossed with a heat tool. I took out my Love Struck cartridge and cut out two different size hearts from my embossed card stock. I edged them in Pale Gold Krylon pen.


I attached the hearts with some pop dots at different levels and finished off the card with a petty little flower. I also used the background stamp on the envelope to tie the project together!


You could use this same sketch for a variety of themes. Happy creating...Kristi


Don't forget to come to my blog and follow! kristiscreativecafe.blogspot.com


Share/Bookmark

Thursday, August 12, 2010

Visual learner? check these videos


Vidoes


Share/Bookmark