Wednesday, September 30, 2009

Cricut Cartridge:Storybook ,Creating Keepsake Magazine & Winners!

After going through the magazine yesterday and earmark a few ideas, I was inspired to scrap our New Orleans pics we took for Spring Break this year that was in storage:)
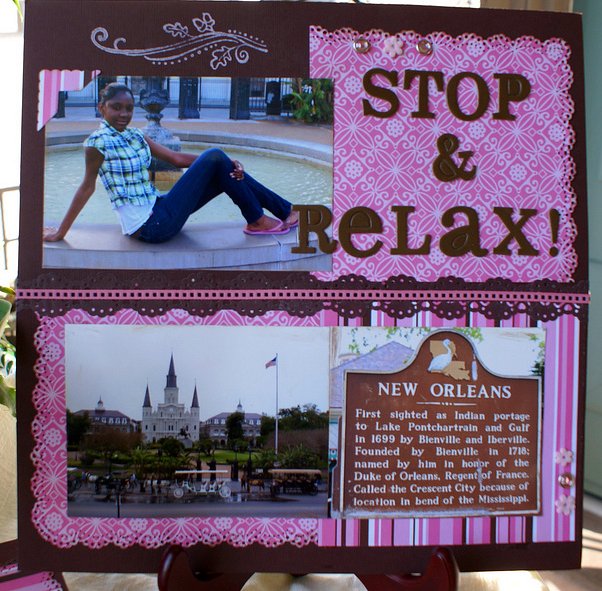
A couple of ideas I found on page 38 of the Creating Keepsake Magazine Super Fast pages with 4x6 photos by Kelly Purkey was to use circles in varying sizes. Kelly Purkey incorporated her title on the circles.
One thing I haven't told you guy's I am an avid stamper, I luv luv to incorporate stamps and the Cuttlebug machine in my work :)
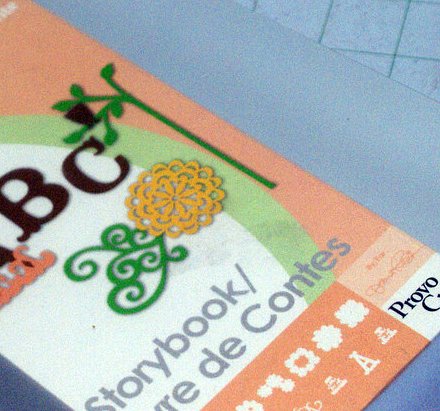
My creative wheels started turning,that Provo Craft Storybook Cartridge has a scallop circle shadow under the letter I. That would work perfectly with my idea of incorporating stamping.

Tips
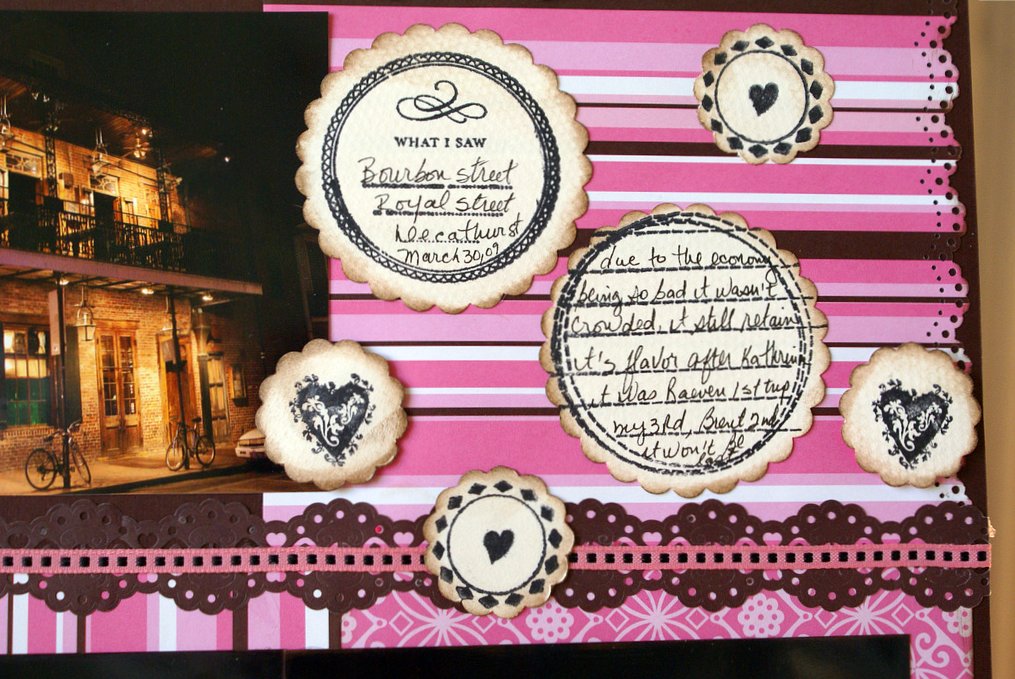
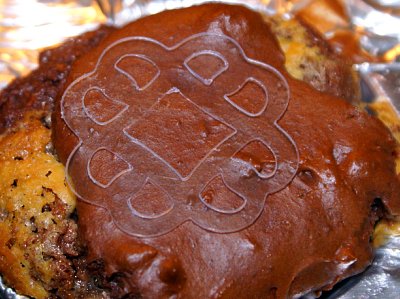
To get the perfect size, stamp on cardstock all the images, then use center point   to cut the stamp circles into a scallop, works perfect every time.

After cutting ink the edges of the scallop and place onto your layout.

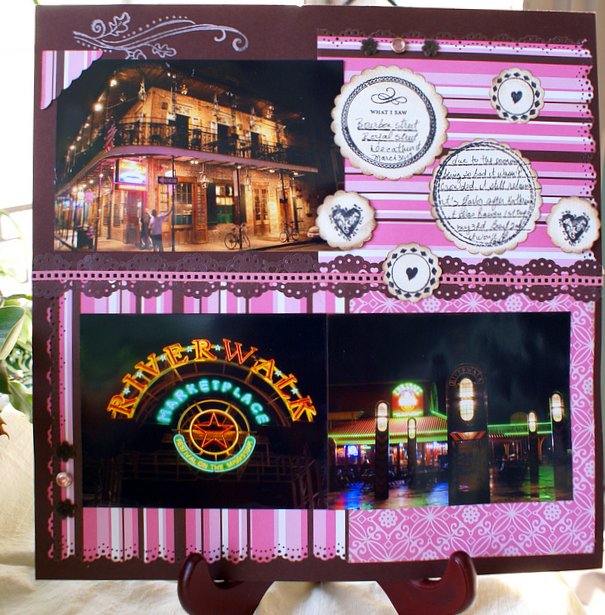
Left page using Staz on white ink to stamp the image using Hero Arts stamp


Right page with the Journaling using the scallop from Storybook Cartridge. I luv luv how the scallop journaling mirror the river walk circle.


Detail of the Journaling using the storybook cartridge.


This lay out I created the flourish using Home accent and Rangers Stickles.
The story behind this pic, I was fascinated by the gold statues that line the Trocadero palace, then I started wondering how many people rush by them without seeing their beauty en route to see the Eiffel tower.
I wanted a different type of shot of the Tower. I waited an hour for the tourist to disperse when I finally got this shot crouching on the ledge, till today this picture has remain my favorite.


Details of the flourish with stickles.


Supply used: Provo Craft Storybook, Home Accents. Ranger Stickle, K & Company, Hero Art stamp, Uhu Glue, Colorbok fluid chalk, Prima flowers, Making Memories, Staz on ink.

Winner of the Storybook Cartridge...

OMG thank God for Random .org :)

Drumroll please.............................

Amy come on down......................................

You have just won the Storybook cartridge from Provo Craft.
Please send us an email at cuttingaboveblog@gmail. including your email address, and addy.
Thank you so much for following the blog and for leaving a comment :)
Have a fantastic time,

Maggie

Don’t forget to participate in the GYPSY GIVEAWAY!!  We are giving away two!!  Deadline is October 3rd.  More details HERE!
 
GOOD LUCK and have a great day!

maggie-sig


Share/Bookmark

Tuesday, September 29, 2009

Publication Review: Creating Keepsake Magazine special issue!


If you are anything like me, you have tons of 4x6 pics just waiting to be made into pages.   There are so many photos I’ve been collecting for the past few years, just waiting to be taken out and worked with.  Yet, the time never came and were finally put back in storage for another later date.
If you find yourself in the same boat,, perhaps you have no idea where to start?  Well, if you need a little nudge on getting those pics out of storage and into beautiful projects, then this book is for you!!

Creating Keepsake Super Fast Pages with 4x6 Photos

I was at the check out yesterday when I noticed this magazine. What drew my attention was the very strong color combo on a relatively very simple layout. With it’s simplicity, I realized I could scraplift this layout very easily with the tools I currently have on hand.  For example, I could use all my Provo Craft Cricut cartridges such as the butterflies, borders, flowers to follow the basic design presented on the cover.  What could be easier??  

After flipping through the magazine quickly,I decided to buy it. I rushed home  to explore the magazine more leisurely and soon realized that a lot of the layouts looked familiar. . . especially the Kelly Purkey and Mou Sasha's projects.

Finally, it dawned on me that most of these projects have been published before in Creating Keepsakes magazine. Now, if you don't have a subscription that's ok. You can catch up. If you do have a subscription, this makes it easy to find layouts that fit your need.  You can easily find project by page separation for 1-2 photos, 3-4 etc.. and so on. 

Before delving into this magazine in length, here's all the things on the cover that drew me in:
  • 95 simple quick pages, make 1  tonight
  • 27 sketches to create pages in a jiffy
  • Scrap more photos with no cropping approach
I was motivated enough to grab my post-its and make notes on different pages.  I noted layouts I liked or the pattern papers, tips and even some sketches I wanted to try. I plan on making 10 lay outs from this book using the sketches and some other great ideas I've found. For example, on page 45, there is a great tip on using a pen in place of that perfect color thread you just cannot find!  

What I liked about this magazine:
  • It is very functional and has the photos separated
  • Tips at the bottom on how to finish a page faster
  • The layout photos are huge. They take up most of the pages so you can see the details better.
What I didn't like about this magazine:
  • Price tag was a little too high at 14.99
  • 85-90% of the layouts were previously published hence the reason the price is too high
  • Not much direction on how to recreate most of the layouts (loved the tips though!)
  • Might be a  hard book for a brand new scrapbooker to follow
What do you think? Do you have this magazine? We will be giving away one of these magazines to a lucky reader!.  To win simply:
  1. be a follower of this blog
  2. leave a comment
That’s it!  What could be easier??  Drawing will held on October 7th and the winner will be chosen by the random.org  tool.  :)

------------------------------------------------------------------------
Don’t forget to participate in the GYPSY GIVEAWAY!!  We are giving away two!!  Deadline is October 3rd.  More details HERE!
GOOD LUCK and have a great day! 
maggie-sig
Share/Bookmark

Monday, September 28, 2009

Christmas Noel Solutions Cartridge-tutorial

Christmas Noel and Shiny Paper
A couple of weeks ago I did a video about making your own shiny cardstock from wrapping paper over on Cuttlebug Challenge. Well, here it is in action, using a fabulous cut from the Cricut Solutions Cartridge - Christmas Noel (thanks to my friend, Kristi!!)


I began by cutting the Swirl Tree on the gold foil paper that had been adhered to plain cardstock with a glue stick. It cut very easily, and left some beautiful "weeds" or left over flourishes that I can use on other projects.


I cut two trees in "blackout" 1/4 inch larger than the gold, so it would show all around the edges. I used dimensional foam dots to give the tree thickness and life. I used Red Stickles to "decorate" the tree.Next I constructed the card with a layer of red mylar adhered to the front of the A2 card, a rectangle of designer paper edged in gold Elmer's Paint Writer in the center, and a gold shimmery ribbon tied in a bow around the card.

The sentiment was stamped with SU's Heat and Stick Powder, heated with a heat gun to make it sticky, gold glitter sprinkled on, and then heated again to set the Heat and Stick. The edges were inked to match the red background paper, and adhered with more dimensional dots.

Simple, elegant, and very easy to do...I hope you will give it a try!
I love the Christmas Noel cartridge.

Tutorial:
Christmas Noel cartridge from Provo Craft available at Hallmark Scrapbooking
We are giving 2 gypsy away more info here

What do YOU think?
Do you have this cartridge? did you find the tutorial easy to follow?


Happy crafting ~
BettyBee


Publish


Share/Bookmark

Saturday, September 26, 2009

Part 3 - Gypsy Adventure in Italy


The Gypsy in Siena

Hi, It's Diane again, checking in from Italy where I have been having a wonderful vacation with my husband - and the Gypsy makes three! Steve has been the "Gypsy holder" for all of the photos - he is a very helpful husband!

We left the home of our friends in Milan on Monday morning and headed to the airport to pick up our rental car for the drive to Siena. The weather had turned rainy but we didn't mind since we were traveling. We stopped at some rest areas along the way and at one they were selling these "Pinocchio" jars full of lego-like blocks - aren't they cute and colorful!

We made a mistake in our directions - not really a mistake but we followed a sign for Roma (Rome) - the direction we wanted to go - and it turned out to be the wrong Roma road! Roads on maps don't seem to have numbers, or if they do, you can't find the numbers on the actual road signs - so driving was an adventure!

Eventually, we found our hotel - behind these very impressive gates! The photo to the right is a view from behind the hotel - what a beautiful landscape. The rain had ended around Firenza (Florence) and the light was lovely. (Remember, you can click on any photo to see a larger view).

We were so glad to be out of the car at last that we decided to stay at the hotel for dinner. The food was delicious and I had the most amazing dessert - a "chocolate muffin with cinnamon pear" - basically a hot chocolate cake with molten chocolate - yum! The meal was so rich and we were so tired that we went right to sleep. I woke up after a while and couldn't get back to sleep, so I pulled out the Gypsy and did some designing for a while. It was nice that the Gypsy does not beep or make noises - I could do some designing without disturbing my sleeping husband.

I welded some titles into frames and also tried doing some of the full page designs that I like to make (paper lace). It is a bit trickier to do these on the Gypsy than in Design Studio - you need to pay close attention to the "x" and "y" coordinates to line things up properly. I think there are some software updates that are coming soon that will make these easier to do ( the Gypsy I am using is an early release).


Tuesday we went into Siena and did some more exploring - the photo at the top of this post is the Gypsy at the Siena Duomo - an absolutely stunning cathedral with distinctive black and white marble stripes inside and out. The churches are so ornate and full of art. Here is one inside view.

We saw an amazing display of very old illuminated manuscripts in the Duomo. I never realized how thick the gilding is on the page. This photo was taken through glass so I hope you can get the effect.

Here is another floor tile pattern from inside the Duomo. I am fascinated by all of the intricate patterns - this one is actually rather simple compared to many we have seen. This may very well end up as a Design Studio or Gypsy file that I will share sometime after I return to the States next week.

I was on the lookout for some unique paper items and I found this store in Siena. I bought some cards and bookmarks and some beautiful hand made marbled paper. I plan to try cutting some of it with my Cricut and using it in a few titles for my scrapbook pages.

What would a trip to Italy be without a time out for a bit of gelato? We enjoyed some delicious cold treats in one of the many squares - in front of yet another church!

The Gypsy has been a great travel companion so far - it is useful for getting some titles done while still on vacation and it is also a nice diversion - sometimes I like to make designs just to relax and I don't need to pull out the laptop to do this.

One thing I have noticed as I create more and more files is that it is very important to be thoughtful in the way you name and save the files. I haven't found a way to collect the files in folders. They seem to appear in strict alphabetical order, with numbers before the letters and there is one interesting wrinkle.

If you use a Capital letter at the start of the saved file name those files appear in one list that is then followed by the titles that began with a lower case letter - so there are actually two alphabetical lists. I hope that this may be changed by an update so you can keep groups of files together in folders. So far I have about 50 files, but as the list gets longer and longer it will be harder to find the files quickly.

We have a lot more sightseeing to do in the next few days - where will the Gypsy go next?
Sign up as a follower to be the first to know about the Gypsy adventure in Italy:)

Don't forget to sign up to be a follower and also to win 1 of the 2 Gypsies we are giving away
HERE

Have a fabulous weekend,


Share/Bookmark

Wednesday, September 23, 2009

Provo Craft Cricut Cartridge Storybook & Cupcake Party &Giveaway?


Hi Everyone,

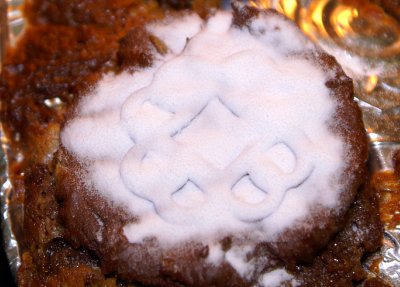
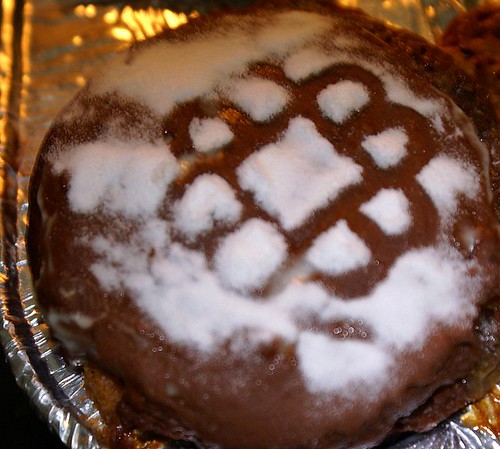
By now I'm sure you think I've had too much sugar and you would be sooo right!!! :) Well with all the excitement of the Gypsy starting at midnight, I couldn't wait to have a cupcake party while watching the show. Then I started thinking. . . why not involve Cricut in helping me make the cutest looking cupcakes in the neighborhood!

I know , I know you are confused right? Ok I’m going to share a secret with you. I don't really care for frosting much.  That’s right, I know that sounds weird. I never have liked icing.  But my DH adores frosting so I always make 2 batches, one for him one for me..(giggles)

Anywho I'm sure you are wondering who is this crazy person.....who doesn't like frosting? Ok by know you know more about me than you wanted to know right??????

Ok let's move on I want to show you a quick fun recipe..

READY????

BTW we are making hot fudge chocolate cupcakes with a center of white chocolate and off course the Cricut yum...

Here's your list of ingredients. (Oh of course you need cupcake pans)

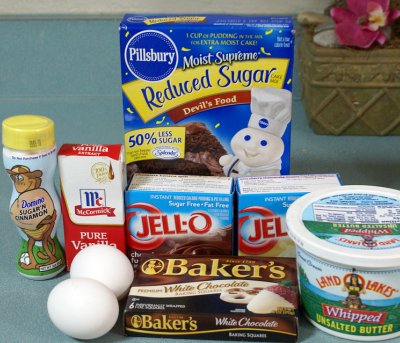
  • Pillsbury chocolate cake mix
  • Butter
  • Vanilla
  • Eggs
  • Cinnamon Sugar
  • Jello (Fudge, Cheesecake)


Let's begin:
  1. Mix the eggs and the 2 tbs butter until smooth then add 1 tsp vanilla and mix.
  2. Ad 1 1/2 cups milk.
  3. Add the jello fudge chocolate sugar free and the cheesecake sugar free until smooth.  Add the cake mixture
  4. Melt chocolate in microwave for 1 mte then stir
  5. Preheat over to 350 degrees
  6. Spoon the cake mixture onto the cupcake liner.  Add the melted chocolate in the middle.  Spoon another mixture on top, see below.


Bake in the oven!

In the meantime , prepare the Cricut to cut the stencil for the decoration for the cupcake. I chose the Storybook cartridge, accent frame  option#5.


Tip:

For the stencil, I used the clam shell the storybook came in.  Great way to recycle packaging.  I used the multi cut, low speed and high pressure setting with blade #6.


Now, I can use the stencil to help me decorate the cupcake with  powder sugar.
Isn’t that kewl???  I can use the Cricut machine from Provo Craft to decorate my cupcakes?


Here's the stencil at work... I'm so excited.  It's a great thing. . .  90% of this cupcake used Splenda.  If I had used sugar, I would be jumping up and down.....(giggles)


Here's the final cupcake.  Isn't it cute????


Now what do you think? Fun eh. Yes, I did use frosting for my DH and DD. They are in happy cupcake frosting land now:)
On to the best part!  We are going to give away a Provo Craft Cricut Storybook Cartridge to one lucky reader!!  All you have to do is

a) leave a comment telling us what you think about the cupcake and

b) become a follower if you haven’t already done so.  It’s that simple!  You can leave as many comments as you want.  Each comment will be counted as one entry.  GOOD LUCK!  

Drawing will end September 29, 2009 at midnight EST and the winner will be drawn/announced on September 30th. 

PS we are still giving 2 Gypsy away more info here


maggie-sig
Share/Bookmark

Project: Gypsy in Italy with Diane - Part 2


Where is the Gypsy now?

Hello everyone, this is Diane. . . the Gypsy wanderer. I am on vacation in Italy seeing the sites and discovering this wonderful new tool, the Gypsy, while we are wandering :)

We arrived in Milan and after a quick stop to drop off our luggage at our friend's home, we all headed into the city to see the sights. We visited the Castillo (castle) and the Duomo (cathedral). Milan is a fashion capital of the world and everywhere we looked, we saw handbags and shoes for sale. Here is one of the most outrageous pair. I don't know the price of these, but one pair we saw was 1500 Euros (about $2,250) - now that's a lot of Cricut cartridges!

Many of the shops are in the Galleria - a very old building similar to the modern shopping mall. This floor grate and tile design was in the Galleria - remember, design ideas are everywhere! I plan to try to design something similar with the Gypsy soon.

Rain was predicted for Sunday but we were very lucky and we were able to take a trip to Lago Maggiore on a beautiful day. Maggiore is a sister lake to Lake Como to the north of Milan. It is a very large lake and the top part is actually in Switzerland.

A very old and wealthy Italian family owns several islands in the lake. On one, Isola Bella, there is an amazing villa and gardens. Here is a view of Isola Bella from the ferry boat. What an amazing place for a "summer cottage."

Here is a larger view of the structure in the garden where I took the photo of the Gypsy at the top of this post. There is a unicorn at the top of this completely over the top centerpiece to the gardens. You can get an idea of the scale from the people in the photo.


We visited a relatively simple church on the "Fisherman's Island" where the workers actually live. There are so many beautiful churches in Italy with amazing artwork in every one of them!

We took the ferry back to the mainland (one more amazing view to the left - those are the Alps). Then we visited Stresa, another town along the lakeside. Our friends wanted to stroll along the lake but I was tired from so much walking, so I was happy to simply sit on a bench and relax.

I pulled out my Gypsy and started to make some titles. It was great to be able to do them while the town names and spellings were fresh in my mind. The Gypsy is so lightweight that it is no trouble at all to carry it along in my bag. I have been using the Gypsy Font for my titles. I like the style and it welds beautifully. Welding on the Gypsy is so quick and easy and I can even tilt individual letters if I want to and still keep them all in the same group. This is a great feature that Design Studio doesn't have yet.

Where will the Gypsy turn up next? Check back soon for the next part of the Gypsy Adventure!

Don't forget to sign up to be a follower and also to win 1 of the 2 Gypsies we are giving away HERE


Share/Bookmark

Tuesday, September 22, 2009

Review: Cricut Home Decor Cartridge

Well, I just purchased the Home Accents Cartridge and I have had a great time cutting with this cartridge! :) I have been cutting right along...literally!! I wanted to share a layout that I did using this cartridge. I only used one image on this layout, but it was perfect!

Here is my layout.


Notice the warm red shape in the left upper side. See it??? Here is how I did it:
  1. I cut it on pink cardstock at a 3.5".
  2. Then paint it with Shimmerz Wed Wagon paint.
  3. Touch up with Shimmerz Vintage Wine Paint.
The shape actually set the stage for the layout itself.   Just look at the images on this cartridge:


I love looking at these :) They are all so great. I have cut about half of them out and am steadily making more projects. I will hopefully have some more to share later this week.
This is a must try cartridge. What else is a must try.....Yep, the New Gypsy!!! I can't say that I have had the privilege of using one yet, but I can't wait for the Gypsy.  Hopefully very VERY soon! There are only a few hours before the official release :)

Home Decor from Provo Craft  available at Hallmark Scrapbooking

We are giving 2 gypsy away  more info here

What do YOU think?
 Do you have this cartridge, if yes let us know what you think of it?


Share/Bookmark

T- 24 for lift off! Countdown to Gypsy on HSN!

Hi Everyone:
ETA:
OMG  huge congrat to
Songbird is our #500th followers please email us at Cuttingaboveblog@gmail to get your pen prize pack from Sakura out to you Saturday!

I couldn't resist since I only live 40 mtes from Cape Caneveral and the Kennedy Space Center! It seems appropriate as we countdown the Gypsy on HSN :)

OMG can you feel the excitement!!!!!!!!! as we count down the last remaining 24 hours before the Gypsy goes live.

Have you told all your friends about the Gypsy? 
Are you having a release party? 
A crop with friends as you debate whether you are going to get one or not?
  
We are giving 2 away on this blog and we can't wait to see who has won!

Have you been a Gypsy Ambassador shouting the event off the rooftops??????????

I am beyond excited to watch the show....


Do you have any lingering questions? Please let us know so we can answer them for you!


OMG we are 7 away to our goal of 500th follower, we are excited to give prizes away.......

Have a fabulous time and don't forget to enter the drawing here 

PS don't forget we will be awarding random prizes for having our blinkie on your blog or signature :)


Share/Bookmark