Friday, October 30, 2009

Silhouette "Think Pink" Candy Container


Supplies: Clear Plastic Tackle Box, Paper – Close To My Heart Chocolate Cardstock, Basic Grey Pattern Paper: Sultry Stylish and Sultry Elite, Recollections Paper: Dark and Light Pink, QuicKutz Silhouette SD, Silhouette Design: Awareness_ThinkPink_1928, Embellishments – Basic Grey Sultry Chip Stickers, Close To My Heart Cocoa Grosgrain Ribbon, Recollections Pink Rhinestone Stickers, CTMH Chocolate Brads, Close To My Heart Chocolate Ink Pad, Adhesives – Therm O Web Craft ZIPS Clear Adhesive Lines, EK Success 3D Pop Dots, Tombow Mono Permanent Adhesive


1. Start by cutting your paper for your base.


Basic Grey Elite Pattern Paper – 6" x 9.75", 1.25" x 12" and (2) 1.25" x 6"


Basic Grey Stylish Pattern Paper – (2) 1" x 6" and (2) 1" x 9.75"


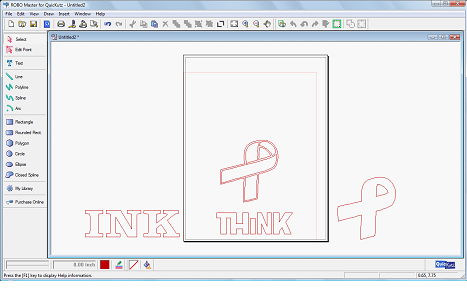
2. Using your Silhouette SD, open Awareness_ThinkPink_1928 in your Robo Master Software. "Ungroup" the design so you can manipulate the file. Separate the designs as seen below. Cut out the "INK" in the light pink cardstock.


4. Bring the ribbon into the page viewer and cut that out with the dark pink paper.


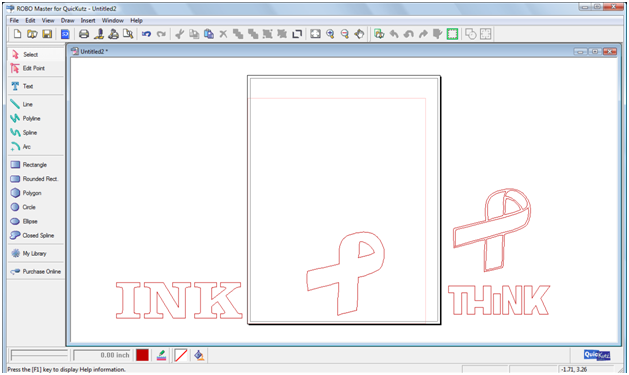
5. Bring in the ribbon outline and "THINK" and cut in Chocolate Cardstock.


6. Ink all edges of your paper and cut-outs. Attach the brown outline to the pink paper ribbon.


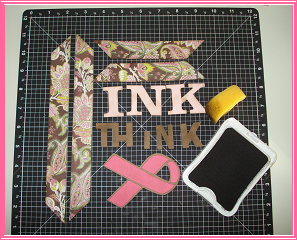
7. Glue the base paper and the edging down to the top of the candy holder. Then glue the "Think Pink" cut outs. I chose to use 3D Pop dots for the ribbon and the "INK."


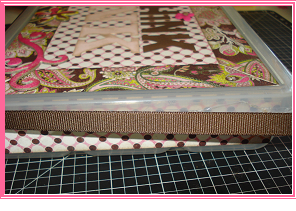
8. Glue the 12" x 1.25" strip of Basic Grey Elite paper on the side of the container centering it in the middle. Fold the edges around the side of the box and adhere. Then glue the 1.25" x 6" strips of Basic Grey Elite paper on each side of the box. Glue ribbon around the edge of the top of the container. Then decorate the candy container as you like.


9. Fill your finished container with yummy candy!


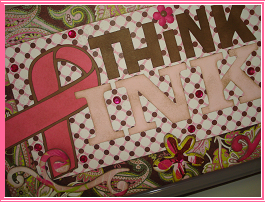
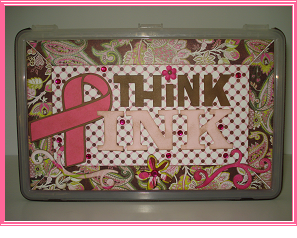
Here is my finished Think Pink Candy Container:


Thank you for visitng Cutting Above Blog.


Don't forget Cutting Above is giving away the exclusive Pink Journey cartridge - just leave a comment on all the Pink Journey Events to be eligible to win.


Share/Bookmark

Tuesday, October 27, 2009

Provo Craft Cricut Cartridge Review: From My Kitchen

Hi, it's Diane from the Design Team and today I am sharing my review of one of the newer Cricut cartridges "From My Kitchen."  I received this cartridge as a prize when my lampshade project was chosen for the Project Corner and Spotlight in the Cricut Chirp newsletter.

Carol already did a very helpful review that you can find HERE.  She also made a great project that you can find HERE.  So I will just be adding a few of my thoughts and ideas about the cartridge.


There are many images of kitchen appliances and tools all with a retro style.  I particularly like this apron and telephone.


The farm and other animals could be used on lots of projects that are not kitchen related.  I think the artwork is charming - just look at the turned up snout on that pig!


For those with a sweet tooth, there is a cupcake, a slice of cake and more cake!


There are two keypads full of pre-welded words - on their own and set into ovals.  Most of the words a quite specific to cooking...


...but with a little creativity, you can find ways to use them for other projects!  I added "'tis the" in the Gypsy Font in this screen shot.


The recipe cards are set up in two rows - the top row is proportioned for 3 x 5 cards and the bottom for 4 x 6 cards.  Just set your height at 3 or 4 and you will have perfectly sized cards for your recipe box each time you cut.  There are also recipe card dividers with tiny symbols sized to fit on the tabs.


By using some Design Studio magic you can even adapt a few of the recipe card designs to create A2 notecards.  This photo shows some cards that I made last month - here is a LINK to the post on my blog if you would like to read more about them.

When I first heard about this cartridge I thought it would be perfect for anyone making a recipe book or doing recipe page swaps with other scrapbookers.  It turns out to have many other uses as well.  I would like to try making a file box with all of the dividers to help organize the cards I have made but have not yet sent.

I tend to look at cartridges from a Design Studio perspective and like to see full cartridges where every feature set has a lot of variety.  The shadow keys for the words in ovals take up two full keypads which seems like too much since I could adapt any oval to shadow my words.  However, I had to step back and realize how convenient it is to have the exact size oval preset on the same key for the circled oval words when you are using the Cricut without a computer.

I think most Cricut users would enjoy this cartridge - particularly those that do a lot of cooking and recipe swaps.  Even if you are not much of a cook, there are plenty of other ways to use the images on the cartridge, so take a good look what this cartridge has to offer.


Don't forget Cutting Above is giving away the exclusive Pink Journey cartridge - just leave a comment to be eligible to win. HERE

Maggie adds:
Do you have this cartridge?
What do you think of it?
Here is where you can find  this cartridge at a very low price Hallmark Scrapbook


Share/Bookmark

Monday, October 26, 2009

Opening Shapes From Library

Good Morning Everyone!!! This morning we will be learning how to open shapes from our Silhouette Library.

First thing is first open a new file, go to view and click view grid as explained in previous tutorials. Next move on over to the left tool bar and click on "My Library"

You library will then begin loading and you may get a window that tells you so while it is happening. When your library opens up you will notice a few tabs to the left. The top tab is listed as "My Digital Designs" these are ALL of your shapes that you have downloaded onto your computer.

The next tab down is "Down loadable Designs" which you can download to your computer from the Quickutz website, if you like any of these designs you can click on one of these and it will take you to the Site to purchase. You can also click on the "Purchase Online" tab in your left toolbar to be taken directly to the Quickutz website to browse shapes that can be purchase for $1.99 a piece.

The next tab is the "Portfolio CD" tab. These are all of the shapes that are downloaded onto your computer when you insert the CD's that can be purchased with one of a kind shapes. You cannot find these shapes in the Quickutz Store online or anywhere else, they are only available on the CD's and completely worth buying. There are 4 different ways you can use each one of these shapes which we will go over in another tutorial.

I always select "My Digital Designs" which is the default and is the easiest way to work because again it shows all of the shapes that you have on your computer. Browse your shapes and find one that suites you and click on it to select it. Then click open design.

Your Library window will disapear and you will have an arrow with a big floating blue box attached to it decide where to place your image and click.
Now you can adjust the size and placement of your image and when you are finished load your media and press cut in the top toolbar and viola you have cut a beautiful shape!!!

I hope you will all come back next week because that is when we start having some major fun with the Silhouette and start exploring the wonderful possibilities that this machine can accomplish!!! I really cant wait to start showing you how much fun you can have!!!
Share/Bookmark

Sunday, October 25, 2009

Design Studio - A Beginner's Guide

Hi, it's Diane from the Design Team.  I have been a Design Studio user for nearly two years and, for me, the Design Studio is an essential crafting tool when working with my Cricut(s)!  I will be doing a series of posts to help all of you who have not yet taken the plunge learn how to make the most of this incredible tool.
So let's start at the very beginning - for someone who has not even opened the box.  Many people are hesitant to get started but once you get going you may forget how to push the buttons on your machine.  It's time to get the software on your computer and start creating!


Inside the box you will find a CD in an envelope - the version of the software on that CD is almost certainly out of date but there is a very important sticker on the envelope with a series of six groups of numbers that you will need to activate your software and make it possible to cut designs with any cartridges that you have in your possession.


The sticker can be seen at the bottom of the envelope (the numbers have been blurred but there are six groups separated by dashes).  There were some copies of the software that were distributed with stickers that only have five groups of numbers.  If you have only five groups you will need to contact Customer Service to obtain a proper serial number.


Also in the box you will find a Quickstart Guide, a User Manual, a cute Cricut Mouse pad and a USB cable to connect your computer to your Cricut.  If you obtained your copy of Design Studio through a rebate program you may only have a serial number.  In this case you can use any USB cable with two ends that look like those in the photo - this is a common printer cable and you probably have one at home already.  The Quickstart Guide and the User Manual are available to download online - click on the name of each to go directly to these resources.

On more important link is to the Design Studio FAQ page on Cricut.com.  If you run into difficulties, some of your questions may be answered there but I believe that the page needs some updating.  For example, the latest version of the program works fine on Vista 64 bit computers (I am using it on my Vista 64 bit computer on a daily basis).


Once you have located your serial number, the next thing to do is to go to the Cricut.com to the Design Studio Page.  Click on the link marked with the arrow to download Design Studio updates.  If you are already registered and signed in on the Cricut.com site you will go directly to the page.


If you have not registered on the site before you will need to complete the simple registration process and sign in.  I highly recommend checking the site frequently - many important announcements can be found on the message board and there is a great community of helpful people who are experienced with the software and may be able to help when you have those "middle of the night" questions.


First you will need to download the up-to-date version of the program by clicking the link - this is the brand new October '09 update.  Once the program downloads, run the installer and follow the onscreen prompts to complete installation. Then open the program and enter your serial number to activate it.

OK - you are finally ready to start creating.  Read through the manual quickly and then watch the VIDEO on the Cricut.com site.  The video was made before some features were added to the software but it is an excellent explanation of "the basics."  In my next Design Studio post,  I will tell you about those additional features and how to use them.

Have fun exploring what this new tool can do for you! 

Don't forget Cutting Above is giving away the exclusive Pink Journey cartridge - just leave a comment to be eligible to win. HERE


(Edited for new update 10-28-09)

Share/Bookmark

Wednesday, October 21, 2009

Simple Breast Cancer awareness card using Pink Journey!

Hello, everyone! I have a fairly simple card for you today using the Pink Journey Cricut cartridge. One of the reasons this card is so easy is because, I just rummaged through my scraps and pulled out all the pink patterned paper that I had. I knew I wanted my card to be mainly pink, but I wanted to add a little more interest by using mismatched pieces.


First I cut a 5" x 10" piece of white cardstock and scored it at the 5" mark. Then I adhered a 4 3/4" x 4 3/4" piece of pink paper on top of that. The third layer is a white piece cut at 4" x 4". A 1 1/2" punch was used to make the pink squares. The last two layers of paper are cut at 3" x 3" and 2 3/4" x 2 3/4".


I then pulled out my Pink Journey cartridge and cut the 'wear pink" and 'ribbon" at 1 3/4. I also cut the shadows for both and adhered the pieces together.

Stitching, ribbon, bling, and a button was added last for a final touch.


Here is the sketch to make duplication a snap!


Have a great day!!

Let us know what you think of this tutorial by leaving a comment?

Leave a comment on all the Pink Journey events for a chance to win the Pink Journey Cartridge.


Share/Bookmark

Monday, October 19, 2009

Silhouette Cutting Guide

Good morning ladies! It's time for another Silhouette tutorial and today we are working with loading your media and using the guided cutting menu. First thing first lets open either a new file or one that has been saved previously.

The very first step is to grab your cutting mat.

Pull off the center wax sheet off of your mat. Be sure to leave the yellow on the edges these make it easier for your wheels on the machine grab the mat and take it through.

Next is a very important step. Load your mat by placing the wheels on your yellow strips and turning your wheel on the left to feed the mat into the machine. This is the very important part, you need to take the edge of your media and take it tot he furthest edge of your black cutting strip.
Now we will start learning how to use the guided cutting menu. Go back to your open file in your ROBO Master software and press the cut button in your top toolbar. Another menu will pop up, go ahead and press ok.

After you press ok your cutting menu will pop up. If you do not see an image like the one below click on the "show operation guide" in the upper right hand corner of the pop up window. Notice that the sections you are working with will be highlighted in the title area and the area on your guide that you are working with.


The first thing the guide asks you to choose is your media type. Click on the drop down box and a long list of cutting possibilities drops down, most of the time it will be the cardstock 40-60 lbs. The silhouette is so versatile however that if you dont see your option you can even create your own media type.
Next is to choose your blade adjustment cap, the guide will tell you depending on your media type which color cap you should put on your blade. For cardstock the software will tell you to choose a yellow cap.
Next is design orientation. This means the direction you would like to cut, for example landscape or portriat. I always select portrait.
The next step is a very important step to pay attention to, this step chooses which orientation you want the machine to cut your image, I'm already used to the default option which cuts upside down but you can change this if its not what you like.

The next step lets you choose exactly where you would like your blade position to rest and where you would like to start cutting.
Next is our final step. Go ahead and click on the big CUT button.

Right above the cut button there are other help options if you get stuck, such as a help button and even animated instructions!!! Next your machine will make some space age like noises and feed the mat back and forth before settling and starting to cut. To unload your media turn the wheel on the left of the machine the opposite direction you did to load your media and peel from your mat! Its SO easy!

Pink Journey Giveaway more info about this giveaway HERE

Share/Bookmark