Showing posts with label Coredinations paper. Show all posts

Monday, May 21, 2012

Where have you gone to MOJO?


Hi Everyone,

Since the divorce and moving, I’ve lost my mojo. I’ve not submitted any work to magazine nor have I fulfilled any of the assignments I was given. Mojo is gone, I have not create any layouts since December. Now you know this is a major crisis since Scrapbooking was my career right?

I was at scrappy boutique store for the first time in a very long time. I was excited however to see what they are created, so guess what? I’m going cropping with my friends next month :)


IF you see mojo please send it back to me :) Click on the images to see them larger.

Here’s a mini album that inspired me using the Teresa Collins line  created for the store display, they have fabulous ideas all over the store:)

20110825_114

20110825_115

20110825_11620110825_11720110825_11820110825_119


20110825_12120110825_122

20110825_123


20110825_12520110825_126


20110825_110

have a great day send Mojo back :)


Share/Bookmark

Thursday, January 7, 2010

Sweet Treat Thursdays

Hi Everyone,
Have you heard the news? Cuttlebug Challenge
introduce Sweet Treat thursday, where they feature, Cricut, Gypsy, Your Story and Yudu Inspirations..

Head over to the Cuttlebug Challenge blog for the giveaway of Everyday paper doll cart and Simply Sweet..

It's with pleasure we welcome our guest blogger Carla, and a member of the team..visit her blog


Me-4carla


Please leave a comment to welcome Carla :)


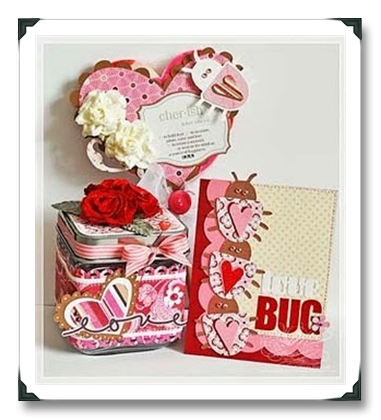
Cuttlebug Challenge blog!! I hope you're all ready to dust off your Cricuts and create a gorgeous Valentines Day set for someone special in your life 'cause I have the *cutest* projects & card to share with you!!

Let's get the show on the road shall we?

For my projects I used the following materials:

Cricut Expression Doodlecharms Cartridge Basic Grey Bittersweet collection kit (stickers, etc) My Crafts ribbon & roses (from the $ store if you can believe it!!) Fancy Pants Stick Pin Doodlebug Sugared Cardstock Prima Leaves Making Memories Stickers (alpha & sentiment) KaiserCraft Rhinestones EK Success Mini Retro Flower Punch

Here are my creations! And i'd like to mention that this gift set can be made with supplies you have at home a few items from the $ store! I bought the huge lollipop, ribbon, roses, and big heart sucker from the dollar store, so for under $5.00 you can create a gorgeous gift!!


To create the jar cover:


1. Cut patterned paper to wrap around jar, punch edges with border punch. 2. Cut contrasting patterned paper to wrap around jar, adhere. 3. Cut scallop heart & heart from Doodlecharms Cartridge, adhere to band & adhere sentiment. 4. Cut white cardstock to fit lid, trim patterned paper to fit over white cardstock, adhere to lid. 5. Adhere roses & paper leaves to lid, tie ribbon in a bow around lid & insert stick pin.


To create the lollipop cover:


1. Cut scallop heart & heart from Doodlecharms cartridge to fit lollipop size.

2. Cut bug from Doodlecharms cartridge and punch heart, adhere to bugs back. Adhere to heart front. 3. Adhere roses and chipboard swirl to lollipop cover.

To create the card:


1. Cut card base to 4.25 x 5.5. Layer with scallop cardstock. 2. Adhere another layer of polka dot paper.

3. Cut bug border from Doodlebug Cartridge to length of 5.5". 4. Cut bug backs from Doodlebug Cartridge out of patterned paper. 5. Punch hearts & adhere to bugs, & rhinestones for eyes.

I hope you enjoyed my projects & they inspire you to create your own!! Be sure to come back and link us up so we can take a peek at your creations!

PS Giveaway on the Cuttlebug Challenge  giving away 2 cartridges :) More info here

Have a fabulous day,

Maggie


Share/Bookmark

Thursday, November 19, 2009

GYPSY - Wine Bottle Wrappers

Hello Everyone! Wow! Thanksgiving is only a week away! Are you ready? This is Tammy and I'm working on it and want to share a project that I made to use as favors for my Thanksgiving dinner guests!  We chose a local wine to serve at our Thanksgiving dinner and bought extra bottles to send home with our dinner guests as a way of saying, 'Thank You' for coming.  I didn't want to cover up the label on the bottles should they like it and want to purchase more in the future.  So, I came up with a wine bottle wrapper that ties onto the bottle with a beautiful ribbon and can be removed for consumption (like my big word? lol!) and to keep as a souvenir of the evening.   


I used the TAGS, BAGS, BOXES & MORE and WILD CARD cricut cartridges.  Using my GYPSY, I was able to re-size the tag to fit around my wine bottle perfectly and layer the frame and sentiment to fit.  I then cut them out with my cricut expression.  See the video below for step-by-step instructions on designing this project on the GYPSY.  You will learn how to (1) re-size images unporportionately, (2) use the new multiple page feature and (3) add an informational page to each of your projects in the GYPSY.


Click HERE if you cannot see the video above.

The WILD CARD cartridge has some awesome features and they can be used for more than just making cards!  Below is the HAPPY THANKSGIVING that I used and there are sentiments for almost every holiday and/or event you would encounter.


But my personal favorite feature of WILD CARD is the frames!  Love, love, love all the frame choices!  I couldn't pick just one, so I alternated these three...


Viola!  My wine bottle wrappers are now ready!


I also love using the wider ribbons and this one was perfect for my project.  Really adds a special touch to my place settings on my Thanksgiving dinner table.


Hope you liked my wine bottle wrappers, I know my dinner guests will!  I also hope that you have a wonderful and safe Thanksgiving Holiday!


Share/Bookmark

Tuesday, October 13, 2009

Product spotlight: Scor-it & Giveaway


Good Morning Everyone,
When I started scrapbooking a lot of today's kewl gadget wasn't around, what I used  for scoring was  a flat silver ware knife for scoring, needless to say I ruined quite a few cards :)
Scor-it has enabled me to create boxes, gift tags,and using Cricut Cartridges boxes, tags and more, it has made the scoring a breeze.

Here's a little bit about Scor-it and why it's the best tool on the market for all your crafting needs.

 HAMMONDSgroup, Inc. was formed in 1990, by Tim Hammonds, with the specific purpose of creating an efficient tool to produce machine-quality scores, in paper stock, by hand.
 I developed Scor-itTM to fill this need and it exceeded my expectations," noted Tim Hammonds, Scor-its inventor.

After Scor-it was created, it became apparent that not only paper companies could benefit from its efficiency, small printing companies could save money by scoring small print runs in-house, large printers could produce stock dummies and customer samples, designers could create client proposals, design and packaging pieces in-house, and creators of greeting card would now have a great tool to score their creations.

I created this Gift Card Holder using Shimmerz, Scor it and the Joy of the Season Cartridge.

Here's the supply list:


Scor-it Mini, Coredination papers, Shimmerz Angels breath, Provo Craft Joy of the season Cartridge and Cuttlebug  5" x 7" embossing folder, holly ribbons,  Rhinestone mambi, glue dots, Uhu glue, Offray ribbons, Coredination papers,Studio G stamps, Stazon ink.

Let's Begin!
1. 5x11,Emboss the coredination paper with the Holly ribbons folder, then use scor-it for the fold.


2. Use Shimmerz to the stripes let dry
3. Use Joy of the seasons to cut the trees, then add shimmerz, adhere to the bottom of the card holder
4. Wrap ribbon around the card under the trees, add rhinestone
5. Cut a tag to stamp the sentiments, add rhinestone


Voila you are done!

 Let us know what you think of the Scor-it tool? Leave a comment below the post.


We are  giving away a set of Just Cats and Just puppies.


Have a fantastic week,
Maggie

PS don't forget to sign up as a follower of the blog :)
Share/Bookmark