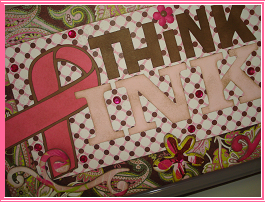
Supplies: Clear Plastic Tackle Box, Paper – Close To My Heart Chocolate Cardstock, Basic Grey Pattern Paper: Sultry Stylish and Sultry Elite, Recollections Paper: Dark and Light Pink, QuicKutz Silhouette SD, Silhouette Design: Awareness_ThinkPink_1928, Embellishments – Basic Grey Sultry Chip Stickers, Close To My Heart Cocoa Grosgrain Ribbon, Recollections Pink Rhinestone Stickers, CTMH Chocolate Brads, Close To My Heart Chocolate Ink Pad, Adhesives – Therm O Web Craft ZIPS Clear Adhesive Lines, EK Success 3D Pop Dots, Tombow Mono Permanent Adhesive
1. Start by cutting your paper for your base.
Basic Grey Elite Pattern Paper – 6" x 9.75", 1.25" x 12" and (2) 1.25" x 6"
Basic Grey Stylish Pattern Paper – (2) 1" x 6" and (2) 1" x 9.75"
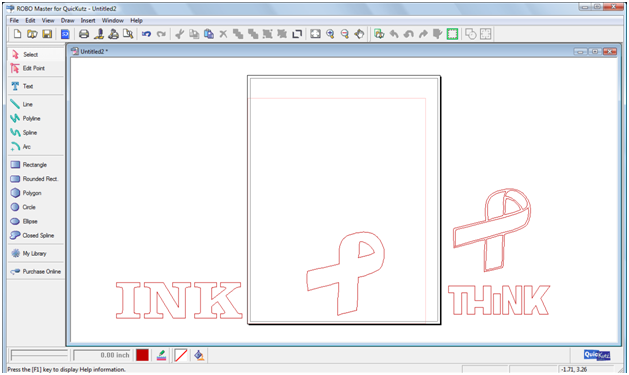
2. Using your Silhouette SD, open Awareness_ThinkPink_1928 in your Robo Master Software. "Ungroup" the design so you can manipulate the file. Separate the designs as seen below. Cut out the "INK" in the light pink cardstock.

4. Bring the ribbon into the page viewer and cut that out with the dark pink paper.
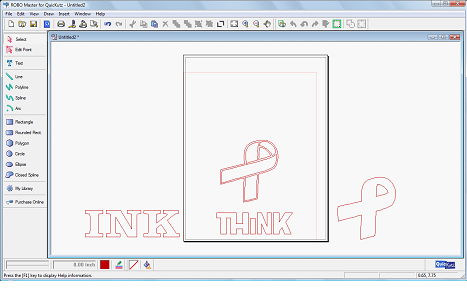
5. Bring in the ribbon outline and "THINK" and cut in Chocolate Cardstock.
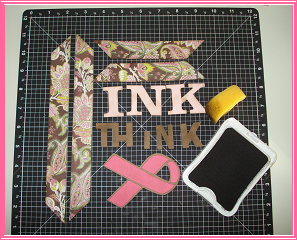
6. Ink all edges of your paper and cut-outs. Attach the brown outline to the pink paper ribbon.
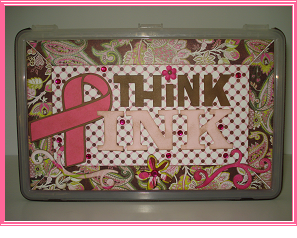
7. Glue the base paper and the edging down to the top of the candy holder. Then glue the "Think Pink" cut outs. I chose to use 3D Pop dots for the ribbon and the "INK."

8. Glue the 12" x 1.25" strip of Basic Grey Elite paper on the side of the container centering it in the middle. Fold the edges around the side of the box and adhere. Then glue the 1.25" x 6" strips of Basic Grey Elite paper on each side of the box. Glue ribbon around the edge of the top of the container. Then decorate the candy container as you like.
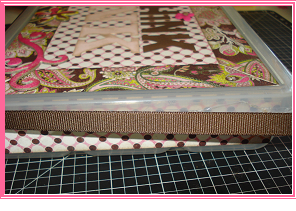
9. Fill your finished container with yummy candy!

Here is my finished Think Pink Candy Container:
Thank you for visitng Cutting Above Blog.
Don't forget Cutting Above is giving away the exclusive Pink Journey cartridge - just leave a comment on all the Pink Journey Events to be eligible to win.




21 comments:
This is a great candy holder idea. Love the papers and the way you used the pink ribbon.
Very cute! Love how you used the ribbon as the "P"!! Thanks for sharing.
I really love this idea! I especially like the paper colors and patterns you chose. Jeanene
Wow, wow, wow! This is such a great idea! We could definately incorporate some of these into our Relay For Life events!! Thanks for the inspiration!!
Very creative project. Love the ribbon P.
great idea! tfs!
This is really cute. Thanks.
Great idea. Very creative to use the ribbon ans the P. Nice.
I love this box. Your choice of papers was great. Thanks for sharing.
Lovely idea, and great tutorial. Love my Silhouette!
love it! This would also be adorable as a candy bar wrapper. Great idea, thanks for sharing.
I like how you used the ribbon for a "P". Cute idea!
Great job! I just LOVE this!!!
What a cute idea...love the ribbon!
TFS
Wow. It makes eating candies feels so special.
Beautiful! Love all your ideas! Thanks for sharing!
This is such a cute idea! Thanks for sharing!
Erica Schott
Very pretty project. I have to get this cart.
The "p" idea is very cute! I'll have to try that sometime!
-Alyson
How very cute!
What a "sweet" idea!
Post a Comment