Monday, November 29, 2010

Want2scrap Blog Hop and a fun Tutorial!

Hi everyone,
I am finally doing much better, thank you so much for all the good wishes. We welcome all of you to our first blog hop with Want2scrap.com
Want2Scrap Scrapbook Manufacturer is proudly sponsoring the Passionately Artistic blog hop! Let me tell you, the line of rhinestone bling and embellishments they currently have is fabulous.  Seriously! If you just can't stop yourself from putting bling on anything that doesn't move, you need to go visit them.  Want to know the best part??  Their prices are really great too.
I’m so happy that you are hopping with us, and leaving fantastic comments for us, with a chance to win fantastic prizes and 2 GIFT CERTIFICATES worth $25.00 plus other goodies.

xmasmagicwant2scrap-REVm
Here are just a few things to remember...
    • Become a follower of  Passionately Artistic and Want2Scrap blogs if you are not already, leaving comments on both sites for all 12 days of Christmas posting for a chance to win.
    • Leave as many comments as you wish, blog about it, tell your friends on twitter, facebook.
    •                                     not one but 2 fantastic prizes.
    • Leave a comment for each designer on the list to be eligible for the grand prize.  Did I mention that there will be two winners of the grand prize??  Yes that’s right.  One winner will be announced on the Passionately Artistic blog and the other winner will be announced on the Want2Scrap blog. On December 18th.
    There will be random prizes to all those who stop at every inspiration blog listed on the hop as well as wonderful sponsor prizes too! 
Here are the list of the ladies participating in the blog hop.
http://Passionatelyartistic.com
http://want2scrapco.blogspot.com/
Michele  http://inspireyourcreativity.blogspot.com/
Sandee   http://simplysouthernsandee.blogspot.com
Maggie   http://MaggieLamarre.com
Terrie     http://terriebaileys.blogspot.com/
Tracy     http://thelittlebluehouseblog.blogspot.com/
Ellen       http://closeyourears.blogspot.com/
Melissa   http://www.instampingmode.com/
Mimi       http://mycharmingblog-scrappermimi.blogspot.com/
Dana       http://paperdaydream.blogspot.com/
Court      http://courtscrafts.blogspot.com/
Melissa   http://blog.melissasamuels.net/

Our tradition, is to wake up early like 2-3 am have breakfast, then share a cup of hot cocoa, yep in the middle of the heat in Florida we have hot chocolate :)

I want to share a simple tutorial on how to create a fantastic gift at a fraction of  the cost.
This Frame is sponsored by Marvy Uchida and Want2scrap.

SONY DSC
When the frame is open, you can see the back side of the front.
SONY DSC
Here is what you will need to recreate this project.
  1. Cut  10 flowers from Home Accent  Cricut  Cartridge sizes 4.5, 4, 3.75,3.5,3.25.2.75,2.5,2.25
  2. Ink all the edges.  Layer in ascending order to create the large flower, then fold the petals towards the center.
  3. Add a clear button to the center, add Want2Scrap bling.  Repeat the same process for the smaller flower.
  4. Add the Rhinestones under the petal to create a continuing line, I had to cut the Rhinestones to create the look I wanted which is what I luv about the Rhinestones the flexibility.
  5. Cut 2 leaves freehand and place on each side.
  6. Repeat the same process for the inside of the frame.
Supplies used:
  1. Marvy Uchida frame, Want2scrap bling.
  2. Cricut & Gypsy, Home Accent  Cricut  Cartridge.
  3. Core’dination Paper, Coloorbok fluid chalk, Blumenthal lansing buttons
Voila you are done.
I appreciate you leaving a comment and following this blog Smile
Have a fabulous day, don’t forget to visit the ladies to see their
If you would like to know about any of the steps, or if you have any questions let me know.  Be sure to leave a way for me to get back to you. Thank you so much!
Maggie


    Share/Bookmark

    Wednesday, November 24, 2010

    Happy Thanksgiving...Dreamweaver Stencils

    I know, I know...it is Thanksgiving tomorrow and here are some Christmas Cards! This is a sneak peek at some of my cards I am posting in the next few weeks of Christmas Cards in not the usual colors. I used Dreamweaver Stencils on both cards. I love the Glitter on the card above and love the pinks! I even inked color on the edges of the clear glitter. Always up or a challenge!

    We were also challenged with using some glossy blue embossing paste. This stuff is AMAZING! I did this card in honor of my Grandma Parker who loved blue and silver at Christmas. I just added the silver glitter over the wet paste. Another item I am just really getting into are the long pins. One of my problems was, I hated the pointy exposed end and don't always like to tuck the pin under something. Simple solution...add a dot of glue, in this case WELDBOND to the pin tip and glitter. It goes with the theme and makes it a much safer card! LOL


    Check out my blog tomorrow and all the creative minds on Dreamweaver Stencils Dream Team. All of the links to all the blogs are on my blog as well!


    As for tomorrow being Thanksgiving, I am thankful for my artistic friends, my family and most of all My Lord And Savior Jesus Christ! Remember to count your blessing when you feel you have nothing to be thankful for...you will be amazed!


    Happy Creating

    Kristi


    Share/Bookmark

    Sunday, November 14, 2010

    I've been attacked by the flu

    Ladies,
    sorry I'm mia, I haven't been able to shake the flu for the past few weeks.
    I'll return as soon as I get better.
    In the meant time visit
    Passionately Artistic.com
    Thanks
    Maggie
    Share/Bookmark

    Tuesday, November 9, 2010

    Jewelry Boxes, Layers of Color, Prima Flowers and Bling

    I love to make these fun jewelry boxes. I start out with a nice coat of paint and go from there. This particular box I used a great texture stencil from Layers of Color. I just found this company recently and LOVE it. Great stamps and wonderful design team.

    So I painted the boxe then after it was dry I used the stencil in each corner and stippled on the ink using a large stipple brush. I let then used embossing powder to make the images pop a bit more. I was still not super happy with the look so used the overlay again and stippled again and off set it just a bit and used a different color of embossing powder. LOVE the out come so far.


    Then I figured out that I did not have just the right bling for the box so headed to my local store, Scrapbook Generation, and got some bling and some Prima flowers. I got those attached and then poured on a very thin layer of epoxy by Envirotec!

    This is a top view!

    I also lined the inside with fabric!
    This is a different style of box but still really fun! Instead of pouring a clear coat on top I used polyurethane to seal the box and it also helped to really adhere the bling!

    I love how the little drawer pulls out and shows the lining. No latch on the lid is alson really nice on this design.
    With Christmas just around the corner I thought maybe everyone could use a little inspiration for a great handmade gift. For the first box you could even sneak in a pack of handmade cards they can send! I love getting handmade gifts that are functional and not just sit around look pretty and get dusty.
    Would love to have you visit my blog and become a follower! When I reach 100 followers I will have another prize drawing!


    Happy Creating

    Kristi


    Share/Bookmark

    Wednesday, November 3, 2010

    Painting, Pears, Windows....oh my

    I have been trying something new. I broke out my Claudine Hellmuth paints and Sticky Canvas and started to play. I have never painted so this is a new. I don't have a style or lessons or any clue as to what I was doing, just decided to do it! So this is my first painting.


    I chose a pear as they are a happy fruit and have character. They also challenge the shading and change in color. I also did a mixture of color for the background.


    I also did not want my pear just floating in space so grounded it on a simple "table top". I wanted the pear to pop out so I added the slight shadowing.


    I like to mix color as it gives more interest. If I am coloring a stamped image or otherwise.

    I did want to make sure and get some of the detail of the pear so added the speckles!


    This is painting #2. Again, I love pears!


    I wanted to add some other elements to this painting. so tried the look of a window and extra pears! I also wanted it to appear there was some texture on the wall. I love to blend several colors loading different colors on my brush at the same time.


    They may not ever be looked upon as GREAT works of art, but at least I am trying something new and I am enjoying the new adventures!


    Last, I am showing some closer shots of some of the areas!


    I hope you have enjoyed my adventure into painting!


    Don't forget to hop on over to my blog to see what I am up to! http://www.kristiscreativecafe.blogspot.com/


    Kristi


    Share/Bookmark

    Monday, November 1, 2010

    Hello November Rive!

    Hi Everyone,

    did everyone had a good Halloween? I don’t celebrate Halloween, but I do give out candy lol.

    I am very excited that it is November 1st, y’all know what that means. It’s almost Thanksgiving time.. My favorite Holiday, why??? My DH makes the most awesome smoke Turkey.

    We start by brining it for 36 hours, then smoke for 8 hours using cedar and his secret recipe on the fire, for that slow smoke juicy turkey..

    Before I start drooling everywhere, here are the winners of the Lunch giveaway, thank you everyone for entering.


    I’m sad to say that mostly when I received comments is when I’m giving something away, I had hope to see my friends more often and engage in conversations.

    I’m thankful for those of you that comes every week to see me :)

    This month I’m starting a new series on Passionately Artistic here. I will be sharing ideas for recipes, timeline to take the hectic out.

    Here’s a fun wreath idea for you..

    Maggielamarre-wreathblue


    Monday:

    310 275c-86400,http _l.yimg.com_jn_util_anysize_419x-86400,http%3A%2F%2Fl.yimg.com%2Fjn%2Fimages%2Frecipes%2F1%2F1%2Fp_R123535Balsamic Pork and Dumplings


    Tuesday

    Monthly lunch outing w/dh. Visiting Macaroni n Grill :)


    Wednesday

    419x-86400,http _l.yimg.com_jn_images_recipes_1_0_p_R048766

    Moroccan Chicken Stew

    Thursday

    Mediterranean Pizza Skillet

    419x-86400,http _l.yimg.com_jn_images_recipes_1_4_p_R107161


    Friday

    Wednesday left over :)

    Here’s this week coupons.

    micheal'sprintablecoupons


    micheal'sprintablecoupons40%


    micheal'sprintablecoupons40%2


    Have a fabulous week,

    Maggie

    PS don’t forget Happy Haunting Cartridge giveaway here


    Share/Bookmark

    Wednesday, October 27, 2010

    Fall, Pumpkins, PanPastels...OH MY

    I confess, I am a fall-o-holic! I love any and all things having to do with Autumn. The colors are awesome, the air is getting cooler here in the mid-west and it is time for friends and bonfires!

    So I decided to start a scrapbook page for me to fill in later. I used a great stencil from Dreamweaver...and I am enjoying them more today than I did the first time I used them.


    Both of these designs were on one stencil. I placed the stencil in the bottom left corner and started layering on the color. I used the PanPastels by Colorfin for the rich deep colors. Rather than using the sponge applicators used in fine art I chose a regular small stencil brush.

    These pastels really have rich pigment so a little dab goes a very long way. I just applied one color until it was all absorbed into the paper and then went back for a color to shade with or to change color. I then blended and went back over the image until I got the desired affect. I love starting with a softer color and building on top. These pastels are so smooth, that when you are done it almost looks like a painted image.

    Next, I shifted the stencil to the top corner and started the process again. The result was this stunning leaf/acorn pattern in the corner. I could have done more, and I may go back in ad stencil some more once I get the photos added. But for now, I am very pleased with the look.

    I did use a spray workable fixative to set the pastels. If you happen to have some stray dust...just erase it away!


    Every time I use these products I am just happy! Jump on over to my blog where you can add a comment and become a follower for a chance to win a stencil.


    If you liked my necklaces...when I reach 50 followers, I will do a drawing with random.org to give away one of my original wire wrapped creations. Check it all out http://www.kristiscreativecafe.blogspot.com/! Only about 3 more people to go to award the prize! Happy Creating!

    Kristi


    Share/Bookmark

    Sunday, October 24, 2010

    Boo To you with a wonderful weekly menu

    Hi Everyone,
    This year you will never know it, but I'VE NEVER celebrated Halloween before. I had a few assignments that requires a Halloween theme.

    This was very easy to create using the Happy Haunting Cricut Cartridge.


    1.Once you have cut the images, ink all the edges using fluid chalk, assemble all the layers and add rhinestones to the eyes of the bats.
    2.Create the rosette by cutting a strip pf paper at 1.25", score using scor-it at .25". ink the edges, fold accordion style, glue he two ends to create a circle, mount on the ribbon using Provo Craft Terrifically tacky glue adhesive .
    3. Use Provo Craft Terrifically tacky glue adhesive to adhere the ribbon to the bats and rosette lenghtwise.
    4.Cut 6 scallop circles for the word boo, ink the edges, sandwich the ribbon between the circles, adhere the letters for boo on top of the circles.
    Voila you are done!
    Supplies:
    Happy Haunting Cricut Cartridge, Terrifically tacky tape, Gypsy from  Provo Craft, K & Company Halloween pad, Mambi rhinestones, Colorbox fluid chalk, May Arts ribbon.

    WEEKLY MENU

    This week menu is very easy, everything is practically baked 1 pot meal.
    Last week there were a huge sale of Campbell's soups, they were $1.00 each, so I took advantage and brought 50 cans, yep you read right 50 cans, plus I had 20 coupons for buy 2 save 50 cents..
    yep I paid $20.00 plus spend $25.00 in groceries and get $5.00 off.

    This week great buy which is the lowest price I've seen in 6 years. Target has the Betty Crocker brownies on sale for $.73cents just in time for Thanksgiving, Bananas for .19 cents a lb..
    Banana bread anyone?


    All images below are from the campbell's site.
    Monday

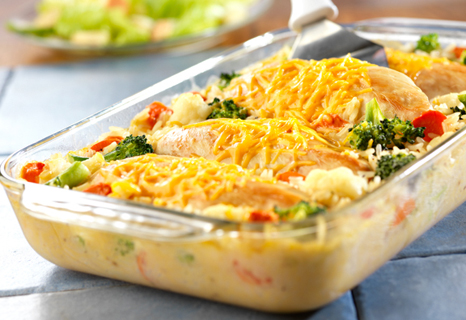
    Cheesy Chicken & Rice Casserole


    Tuesday

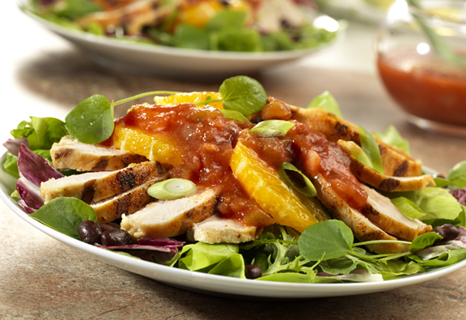
    Southwestern Grilled Chicken Salad


    Wednesday

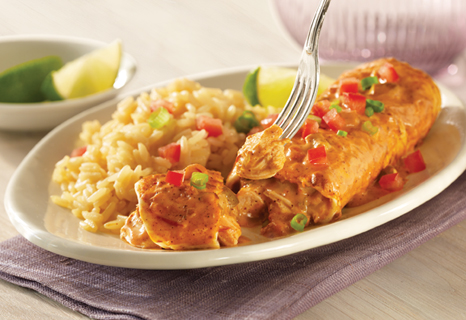
    Easy Chicken & Cheese Enchiladas


    Thursday

    Monday's left over :)


    Friday

    Eggplant lasagna instead of pasta use eggplants instead  with fresh mozzarella and basil...yum..


    Saturday

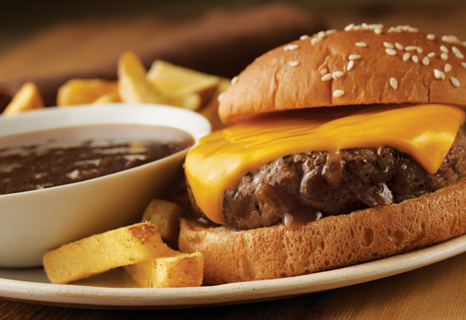
    French Onion Burgers

     What's on your menu this week? 


    Hobby Lobby coupon'

    Have a fabulous week,

    Maggie


    Share/Bookmark